Beautiful options for creating PDFs with LaTeX

Adobe’s PDF format has become a standard for the exchange of beautiful documents. Let’s start with some less obvious options for the meta data of PDF documents. These are important for search engines, both online and locally, to correctly index your document. It can dramatically improve the ranking of your documents.

Acrobat knows title, author, subject and keywords to describe your document:

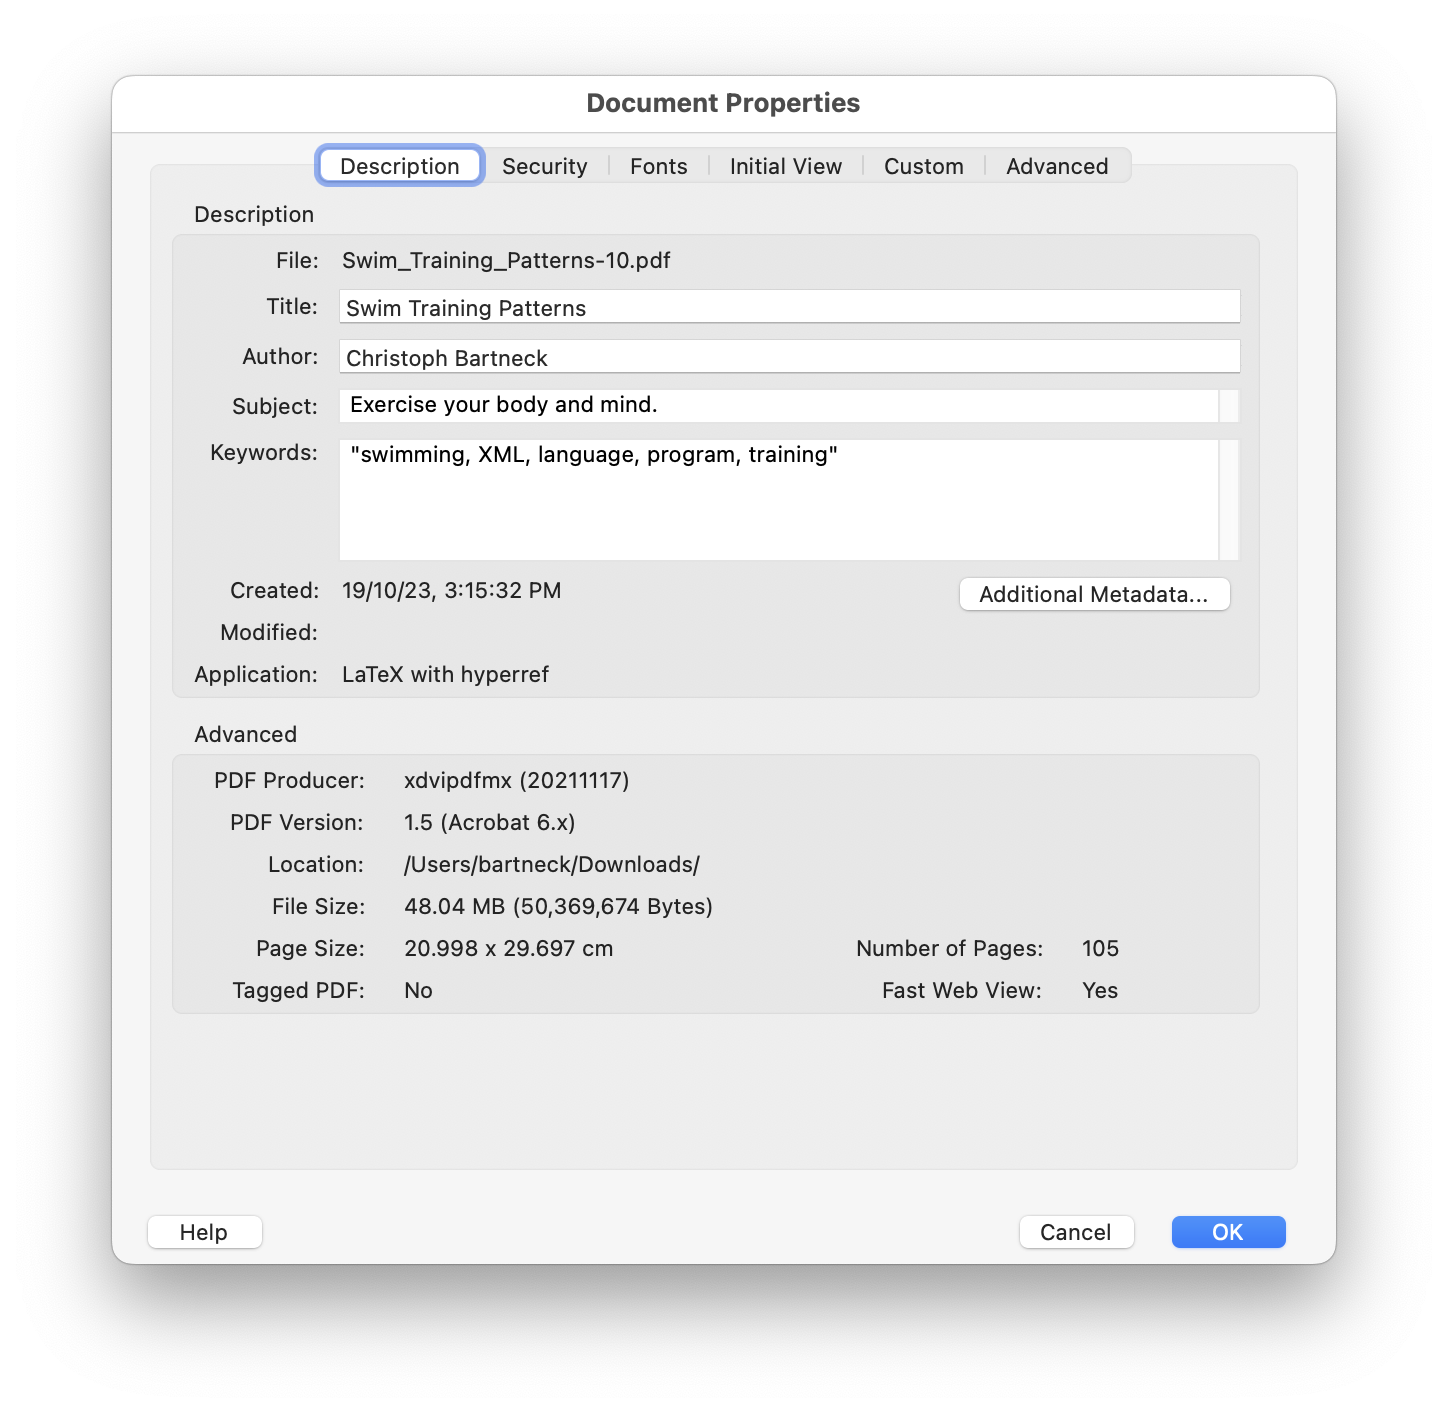
In LaTeX, these options can be set using the popular hyperref package. I barely create any LaTeX project without it. You can setup the meta data for the PDF document with pdftitle, pdfauthor, pdfsubject and pdfkeywords:

\usepackage{hyperref}
\hypersetup{
    pdftitle={Swim Training Patterns},
    pdfauthor={Christoph Bartneck},
    pdfsubject={Exercise your body and mind.},
    pdfkeywords={swimming, XML, language, program, training},
    pdfpagemode={UseOutlines},
    pdfcenterwindow={true},
    pdfdisplaydoctitle={true},
    pdffitwindow={true},
    pdfpagelayout={SinglePage},
    pdfstartview={Fit},    
    pdflang={en-US},    
}

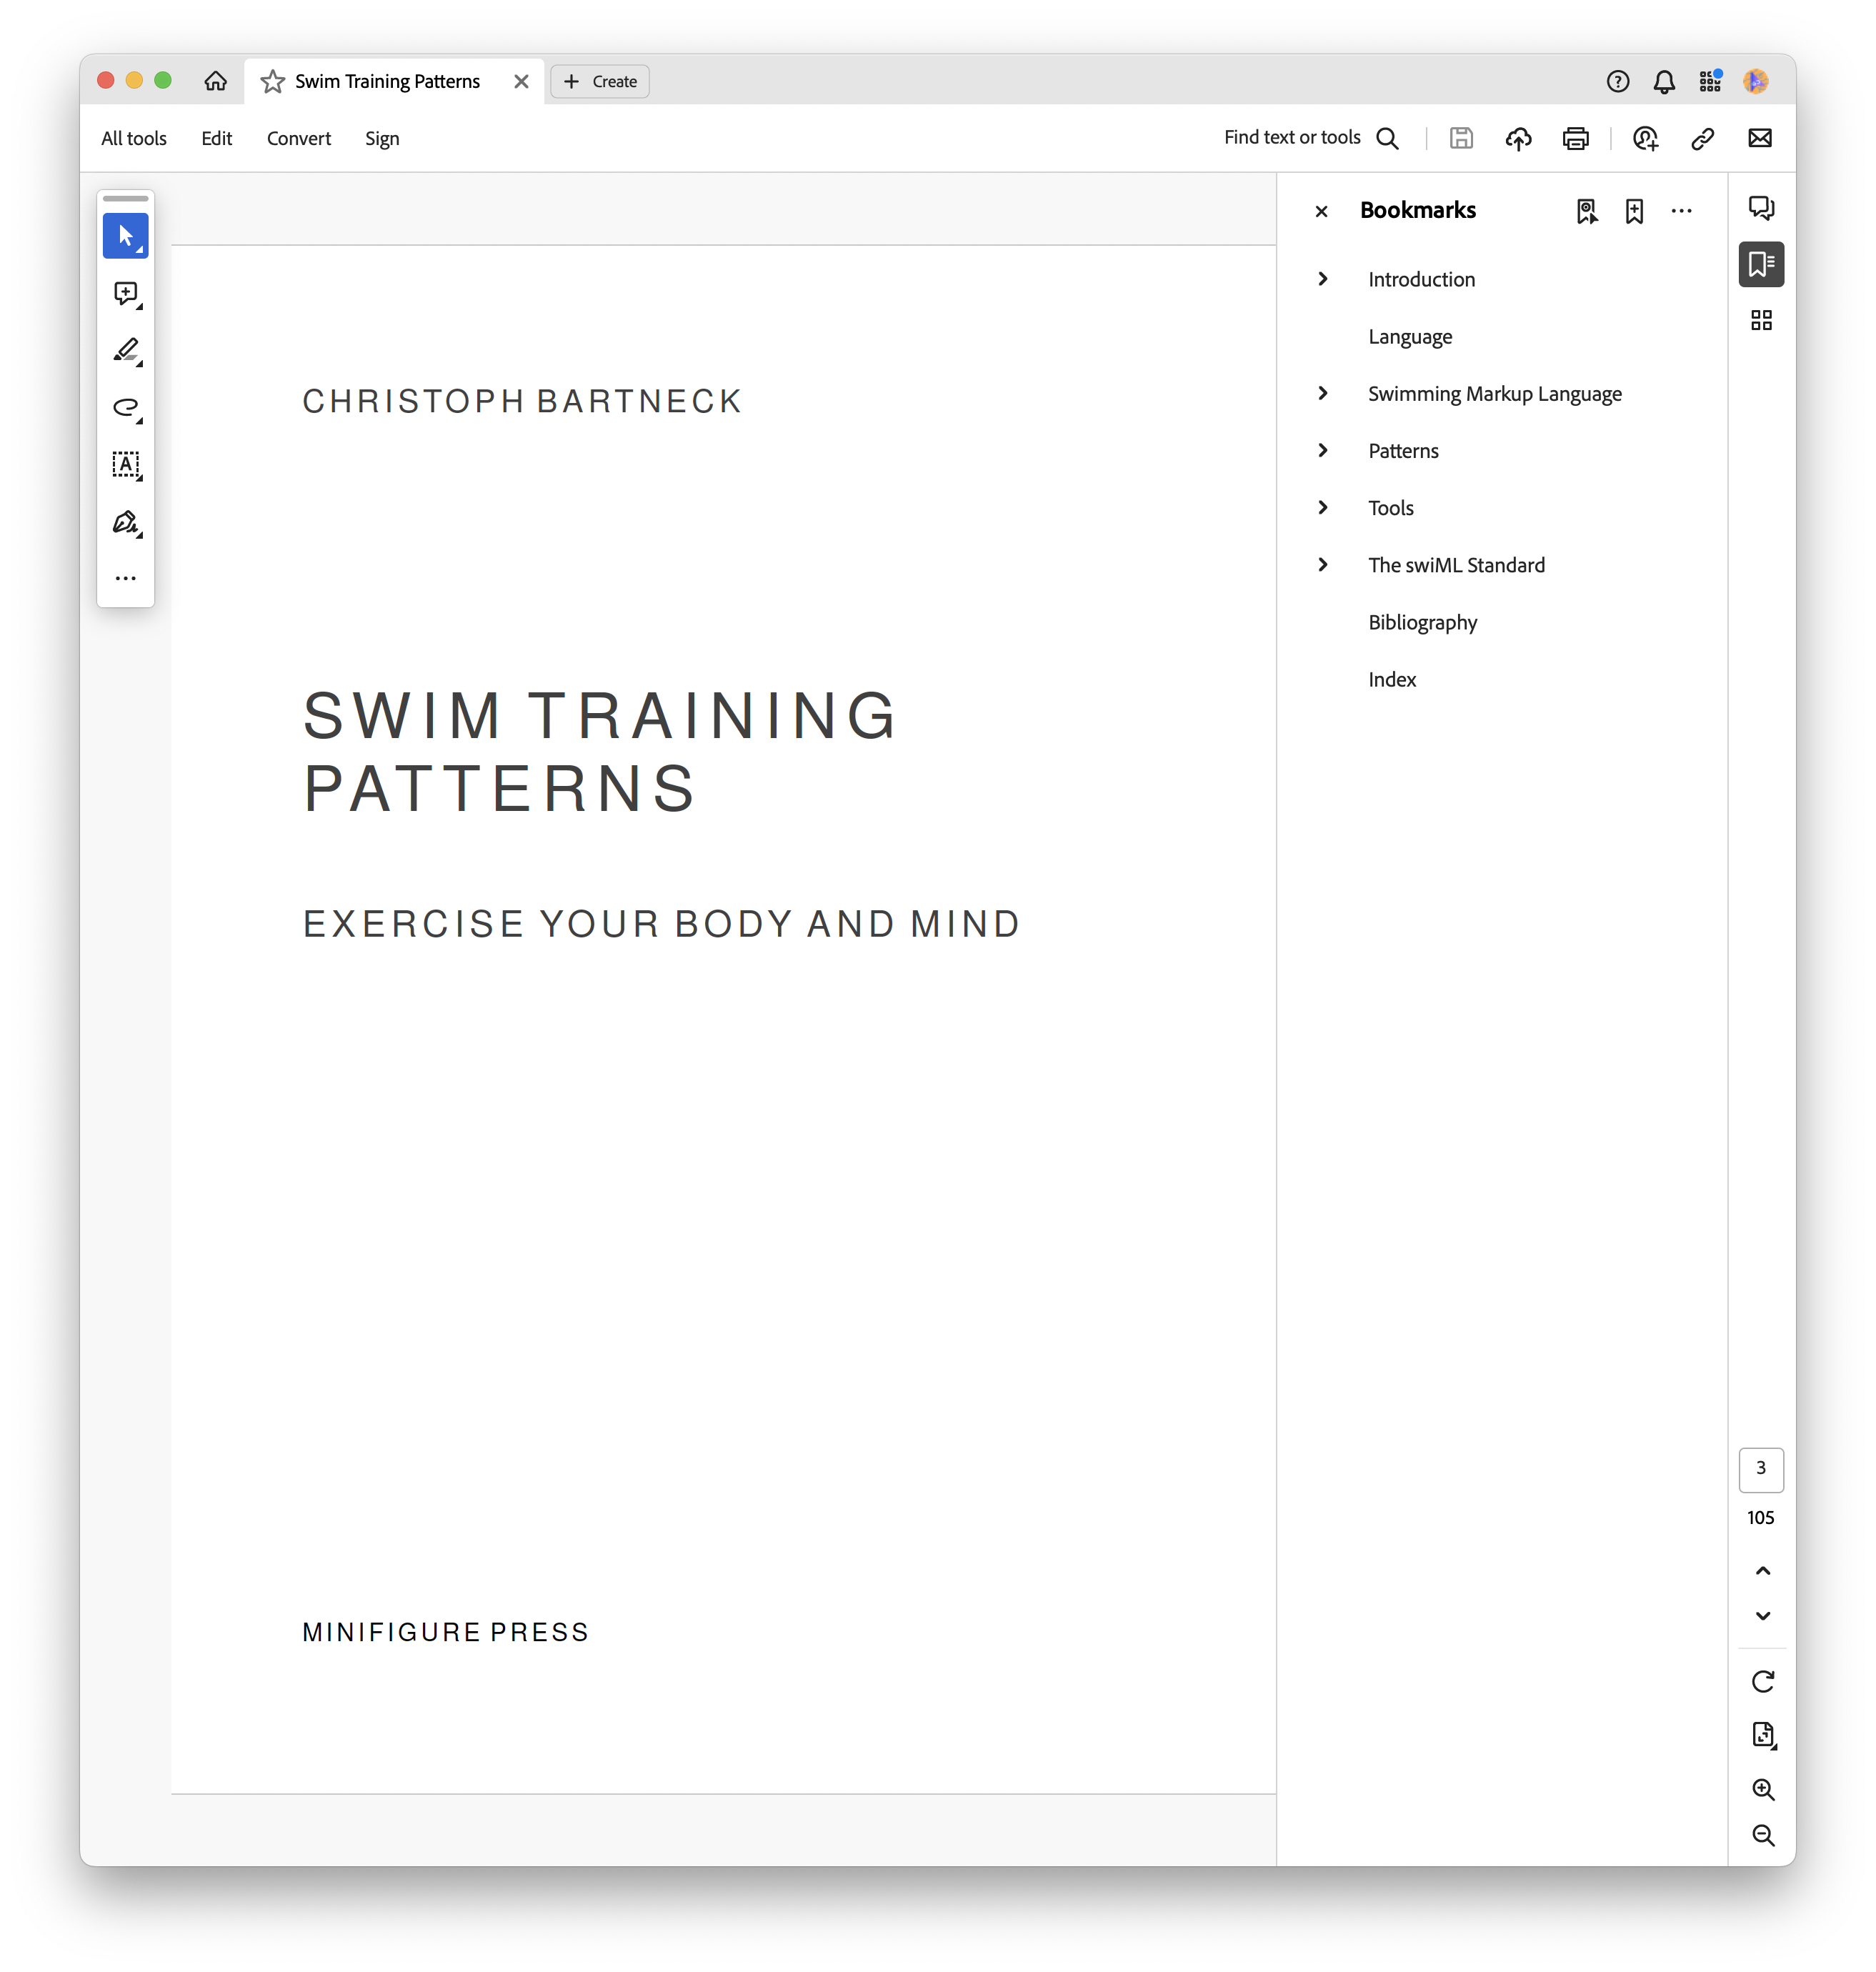
Acrobat also offers options for how PDFs are displayed when first opened:

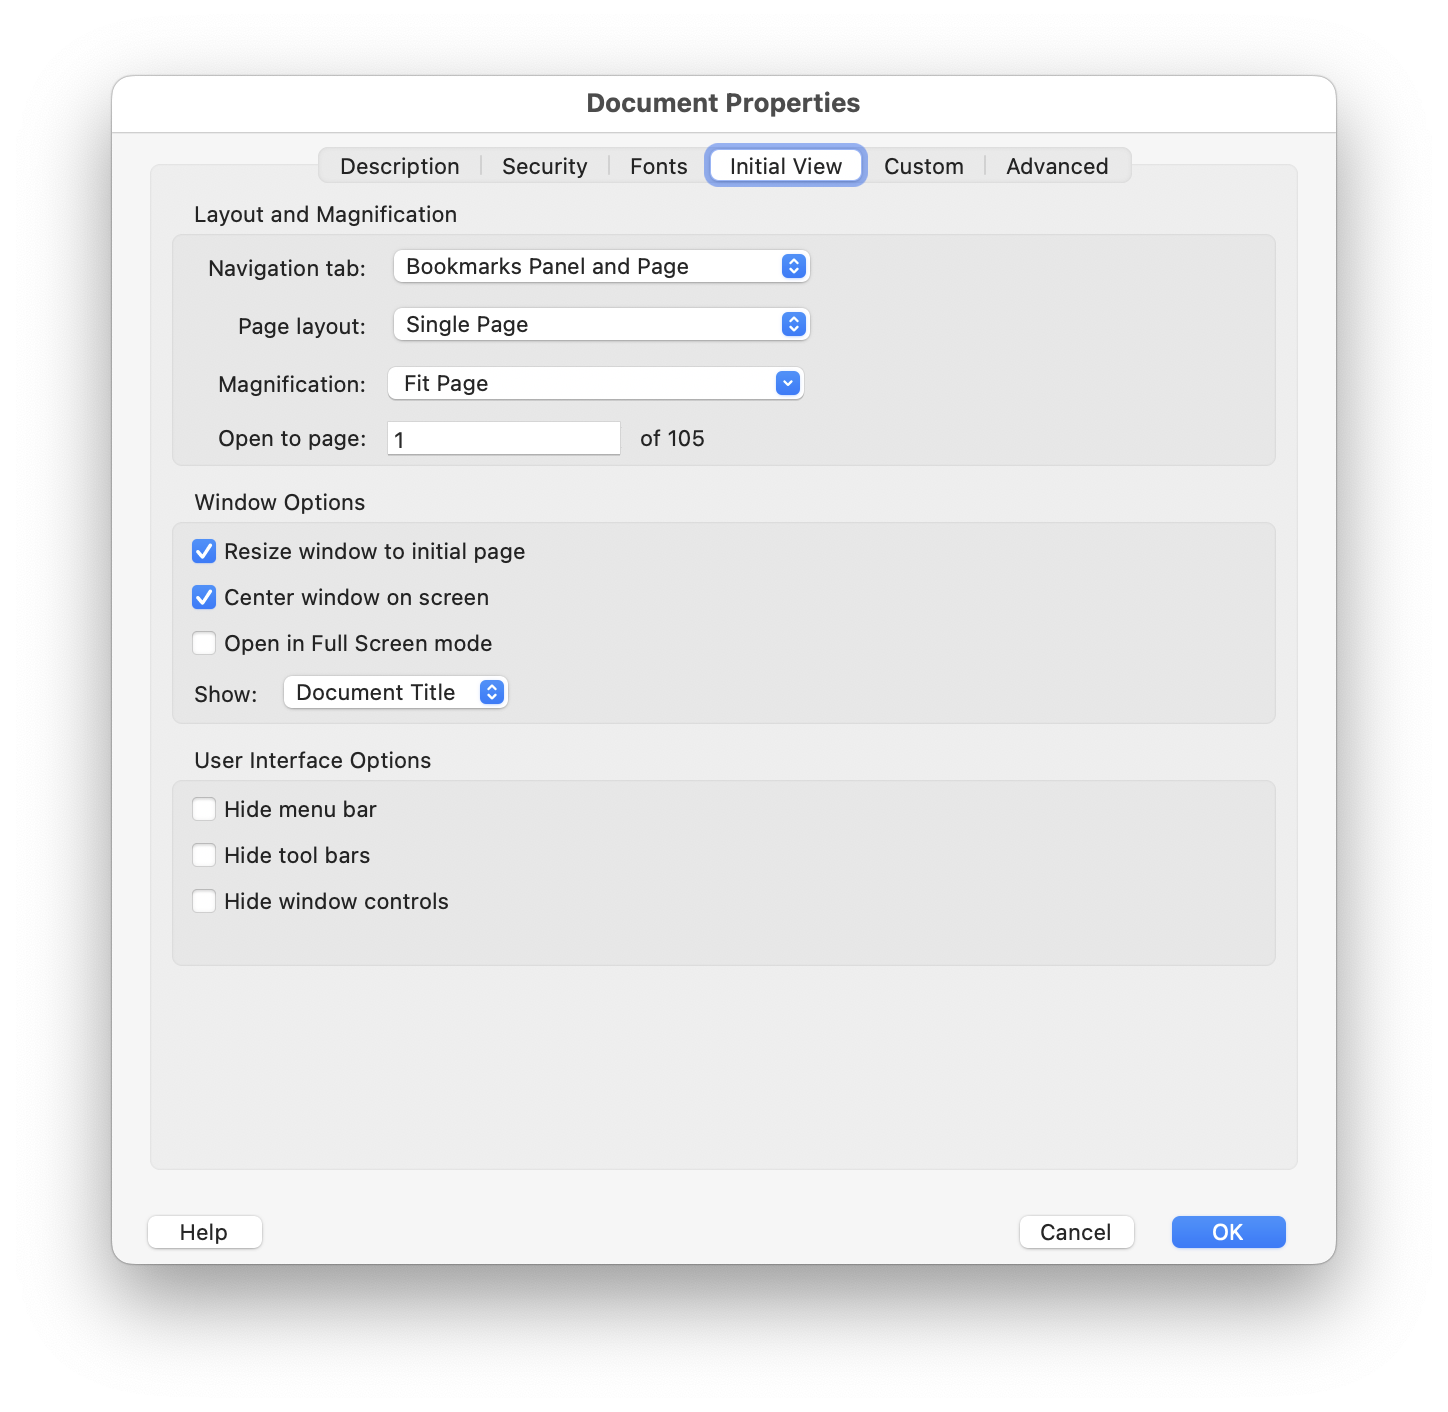
Important options here are the presence of the bookmarks. These will be based on the headlines used in your LaTeX code (pdfpagemode). I normally use a single page for the layout (pdfpagelayout) that is fitted to the screen (pdfstartview). The enclosing window can be resized to the initial page (pdffitwindow) and centred on the screen (pdfcenterwindow). Last, it makes sense to use the document title for the window title instead of the file name (pdfdisplaydoctitle).

If you set all these parameters, you get a beauatiful and functional PDF that gives a perfect first impression when the user opens it.

Overleaf supports visual tables directly

In the past, I used the TableGenerator to create tables for LaTeX. It was quick and easy to upload a CSV and then format the table. I then copied the LaTeX code to Overleaf.

Overleaf always had a macro for the generation of tables on the code level, but now they also have a visual table editor. To use it you have to switch to the Visual Editor and clicking on the three dots icons reveals the new insert table option. Similar to office applications, you can draw the number of rows and columns you want.

It is not yet possible to draw individual borders, such as horizontal lines. You can only select all or no borders. The menu does, however, announce that they are working in more border settings. TableGenerator is still ahead on this one.

You can enter data directly or copy and paste data from your spreadsheet program. You can also set the alignment of columns.

Merging cells also works already.

The complied table is clean and simple.

The resulting code is clean and correct.

\begin{table}
    \centering
    \begin{tabular}{lrr}
 & \multicolumn{2}{c}{Data}\\
         Month&  Sales& Profit\\
         January&  100& 50\\
         February&  200& 70\\
    \end{tabular}
    \caption{Test of the table feature}
    \label{tab:my_label}
\end{table}

Drawing LEGO Bricks in LaTeX

Sometimes the star align and bring together several of your passions. I love LEGO and I love LaTeX. Thanks to Sam Carter and his TikZbricks package, you can now draw LEGO bricks directly in LaTeX. Let’s start with a simple example of drawing a single 2×4 brick:

\documentclass[a5paper]{article}
\usepackage{tikzbricks}
\begin{document}
\begin{tikzpicture}
   \brick{4}{2}
\end{tikzpicture}
\end{document}

This will be rendered as:

TikZbricksLEGOLaTeX01

It is possible to build whole models with this package. The LEGO company created its first augmented reality puzzle game that used a mobile app in 2011. It was called Life Of George. This seems like a perfect example for putting TikZbricks to the test.

\documentclass[a4paper]{article}
\usepackage{tikzbricks}
\definecolor{lego-white}{rgb}{0.95, 0.95, 0.96}
\begin{document}

\begin{wall}
    \wallbrick[color=black]{2}{1}
    \addtocounter{brickx}{1}
    \wallbrick[color=black]{2}{1}
    \newrow
    \wallbrick[color=blue]{1}{1}
    \addtocounter{brickx}{2}
    \wallbrick[color=blue]{1}{1}
    \newrow
    \wallbrick[color=blue]{4}{1}
    \newrow
    \addtocounter{brickx}{-1}
    \wallbrick[color=lego-white]{1}{1}
    \wallbrick[color=red]{4}{1}
    \wallbrick[color=lego-white]{1}{1}
    \newrow
    \addtocounter{brickx}{-1}
    \wallbrick[color=red]{1}{1}
    \wallbrick[color=red]{2}{1}
    \wallbrick[color=black]{1}{1}
    \wallbrick[color=red]{1}{1}
    \wallbrick[color=red]{1}{1}
    \newrow
    \addtocounter{brickx}{-1}
    \wallbrick[color=red]{3}{1}
    \wallbrick[color=black]{1}{1}
    \wallbrick[color=red]{2}{1}
    \newrow
    \wallbrick[color=lego-white]{4}{1}
    \newrow
    \addtocounter{brickx}{-1}
    \wallbrick[color=lego-white]{2}{1}
    \wallbrick[color=black]{1}{1}
    \wallbrick[color=lego-white]{1}{1}
    \wallbrick[color=black]{1}{1}
    \newrow
    \addtocounter{brickx}{-1}
    \wallbrick[color=yellow]{1}{1}
    \wallbrick[color=lego-white]{2}{1}
    \wallbrick[color=yellow]{3}{1}
    \newrow
    \wallbrick[color=yellow]{4}{1}
\end{wall}

\end{document}

This will be rendered as:

TikZbricksLEGOLaTeX02

There are many more options, such as chaning the perspective and size of various components. But we will leave this for now and simply enjoy this moment.

Automatic cross referencing in LaTeX

In technical and scientific writing it is common to references figures, tables and equations in the text. The figure, for example, would have a caption that reads “Figure 1: Robot at the beach”. In the text we then want to reference this figure as (see Figure 1). For far too long I made my own life too difficult by not taking advantage of some of the more advanced featurs of LaTeX. Here are some leasons I learned.

It would be possible to hard code the reference in the text by writing (see Figure 1), but this is not recommendet since the numbering might change when you add more figure or tables . Hence we use dynamic referencing by giving each figure or table a label which we reference using the \ref{label} command. In the text we would write (see Figure \ref{fig:robot}). Here is a complete example:

\documentclass[a5paper]{article}
\usepackage{graphicx}
\usepackage{lipsum}
\begin{document}

\lipsum[2] (see Figure \ref{fig:robot})

\begin{figure}[h]
\includegraphics[width=0.5\linewidth]{robot.jpg}
\caption{Robot at the beach}
\label{fig:robot}
\end{figure}

\end{document}

This will be rendered to PDF as:

Cross_referencing_documentation_01

The first, and possibly most effective time safer, is to use the \autoref{label} feature of the hyperref package. You should probably always use this package anyway for other reasons by adding \usepackage{hyperref}.

\documentclass[a5paper]{article}
\usepackage{graphicx}
\usepackage{lipsum}
\usepackage{hyperref}
\begin{document}

\lipsum[2] (see \autoref{fig:robot})

\begin{figure}[h]
\includegraphics[width=0.5\linewidth]{robot.jpg}
\caption{Robot at the beach}
\label{fig:robot}
\end{figure}

\end{document}

This will automatically add the appropriate type of reference. For the figure type, it will add “Figure” to the text for you. This will be rendered to:

Cross_referencing_documentation_02

This also works for tables and equation. I wished I had know this little feature much earlier.