
The Neural Network manager for NXT is a Java Graphical User Interface which allows Lego fans to easily create, manage and train a neural network which can be exported and used in any program to be designed to run on the LEGO NXT. The total system comprises of two main parts, a UI running on the NXT and the Neural Network Manager running on the PC. The Neural network is created by the Neural Network Manager and can once trained be exported to a Java file that should be compiled and uploaded to the NXT. The NXT side of the system handles the I/O with the sensors (in our application the LEGO Sound sensor) and the communication with the PC. It pre-processes the data and sends it to the PC side via a bluetooth or USB connection.
The neural network that is created is a three layer network comprising an input, hidden and output layer. The input layer has 50 neurons, the hidden a minimum of 50 and the number of neurons in the output layer depends on the number of desired outputs. The neural network manager has been use for a simple voice-command control of the NXT brick, but it can also work with the other NXT sensors. In the example below, we will use the Neural Network Manager to implement a voice control for the NXT. You might the following background literature useful:
- Maximum Lego NXT: Building Robots with Java Brains by Brian Bagnall
- Introduction to Neural Networks with Java by Jeff, T Heaton
- Mobile Robotics: A Practical Introduction by Ulrich Nehmzow
Using the Neural Network Manager
The Neural Network manager for NXT is a Java Graphical User Interface which allows you to easily, create manage and train a neural network. The total system comprises of two main parts, a UI running on the NXT and the Neural Network Manager running on the PC.
0) Download the Java files
First, you need to download the java source files for the PC and the NXT. You may also download the compiled Neural Network Manger for the PC as a JAR file. The documentation of the source files is available
1) Connecting to the NXT
Before you start, make sure that you have compiled and uploaded the RecSoundSamples java class and the PreProcess java class to the NXT. You can achieve this easily by including both classes in the same project in Eclipse. I For help on setting up communication with the NXT for uploading to the NXT using Eclipse see this tutorial. If you upload the files manually, make sure that they are in the same directory.
1. Turn on your NXT and run the java program RecSoundSamples.
2. Choose your preferred connection type USB or Bluetooth using the arrow buttons (fig. 1). If chosen Bluetooth the NXT displays “Waiting” (fig. 3) and waits for your computer to connect. When you select USB, (make sure you connect the USB cable first) the NXT displays connected (fig. 2).
 figure 1 |
 figure 2 |
 figure 3 |
3. Open the Neural Network Manager on the PC
4. Select the desired connection (fig. 4 and 5) and press the “Connect to NXT” button. When connecting trough Bluetooth, you should first enter the NXT’s mac-address (fig. 5) (can be obtained through Windows Bluetooth setup) if you entered the correct mac-address and pressed “ Connect to NXT” the NXT should now display “Connected” (fig. 2)
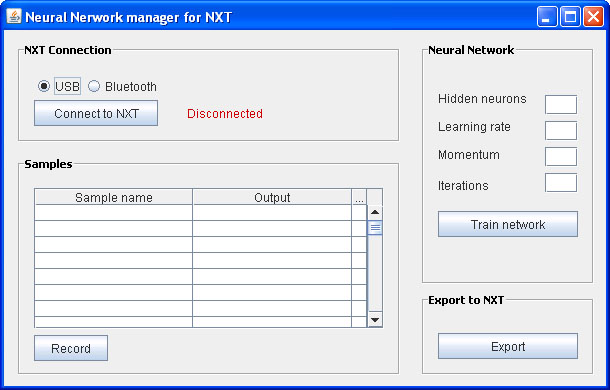 figure 4 |
 figure 5 |
2) Recording Audio Samples
Before you start, make sure your connection with you NXT is set up correctly, as described above, and that the sound sensor is connected to Sensor Port 1. While recording audio Samples, make sure you keep the environmental noise low.
1. Press “record” button in the Neural Network Manager on your PC to start recording. Press “stop” to end the recording and the sample will appear in the sample table.
2. Rename the sample if desired and fill in a digit (starting at 0) in the output column (this will be the identification) of the sample (fig. 6). We recorded the the words “stop” and “start”. We grouped all the “stop” words with the digit 0 and the we grouped all the “start” words with the digit 1.
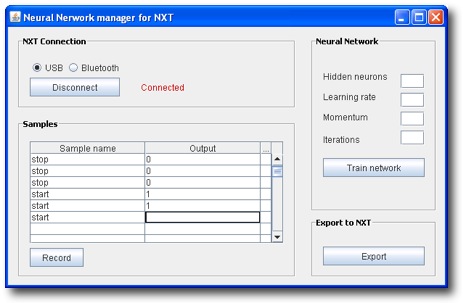
3. Repeat the steps 1 and 2 for every sample. For a better performance it is recommended to record several samples of one voice command. If you for instance like to teach the NXT to recognize “start” and “stop” record multiple samples of “start” and “stop” (all “start samples get output value 0 and “stop” samples get output value 1).
3) Training the network
Once the samples are recorded and stored in the table and output values are assigned, the network can be trained. To train the network:
1. Set the number of neurons in the hidden layer (a minimum is the number of neurons in the input layer which is 50 in this case). If you do not which to specify the systems default is 50.
2. Set the learning rate indicating the increments of changes to the weights (value between 0 and 1). Default is 0,5.
3. Set the momentum (optional)
4. Set the number of learning iterations (default is 1000)
5. Press the “Train network” button. The network will now train and the result, as a value of accuracy will appear. If the number is not close to 100 you can train the network again with more iterations. (fig. 7)

4) Exporting trained neural network to the NXT
After the network is trained, the network can be exported as a java class. To export the neural network press the “Export” button. The program now auto-generates a .java file named “nn.java” This class should be compiled and uploaded to the NXT. For help on how to use the neural network in your own design java program see the test program nnTest.java, read the teo JavaDoc (page1, page2) and explore the test program.
/*
* =====================================================
* (c) Rick van de Westelaken & Bram van der Vlist 2007
* MasterClass Technology fall/winter 2007
* =====================================================
*/
import lejos.nxt.ButtonListener;
import lejos.nxt.LCD;
import lejos.nxt.SensorPort;
import lejos.nxt.SoundSensor;
import lejos.nxt.Button;
public class nnTest extends Thread implements ButtonListener{
nn netwerk = new nn();
SoundSensor sound = new SoundSensor(SensorPort.S1, true);
boolean recording = false;
int[] recordedSamples = new int[300];
public nnTest()
{
Button.ENTER.addButtonListener(this);
Button.ESCAPE.addButtonListener(this);
}
public void buttonPressed(Button btn) {
if (btn == Button.ENTER){
recording = true;
}
}
public void buttonReleased(Button btn){
if (btn == Button.ENTER){
recording = false;
}
}
public void run()
{
while (true){
int i=0;
while (recording == true){
recordedSamples[i] = sound.readValue();
i++;
try {Thread.sleep(30);}catch (Exception e){}
}
if (i > 0)
{
int[] toNN = new int[i];
for (int j =0;j<i;j++){
toNN[j]=recordedSamples[j];
LCD.clear();
LCD.drawInt(netwerk.getVoiceCommand(toNN), 1, 1);
LCD.refresh();
}
}try {Thread.sleep(100);}catch (Exception e){}
}
}
public static void main(String[] args) {
nnTest nnxt = new nnTest();
nnxt.start();
}
}
Pre-processing of data
In case you would like to use other sensors for the input of the neural network, you need to understand the pre-processing. The recorded signal, in this case generated by the “sound sensor”, needs to be pre-processed before it can be used as input for the neural network. The number of recorded values in one series needs to match the number of neurons in the input layer of the neural network. The number of input neurons used in the standard class is 50, but can be adjusted using the “sampleNumber” variable. In the following text, we will assume the standard value of 50. The first step of the pre-processing is to get a series of exact 50 values. A difference between raw data with more than 50 values and raw data with less than 50 elements is made.
- Raw data with less than 50 values: To get exact 50 values in a series the missing elements are filled with the value “0”.
- Raw data with more than 50 values: When a series has more than 50 values the number needs to be decreased to exact 50. This is done by calculating the integer values of the original series scaled to a length of only 50 values.
The last step of the pre-processing is to scale the values to a range from zero to one. This is a condition to let the neural network function optimal. To reach this the highest value of a series is set equal to 1 and the other values of the series are scaled with the same factor. The decision for this way of pre-processing is chosen for two reasons: First to decrease the dependency of the loudness of recorded commands. Second to make the network usable for different types of sensors.
The Neural Network manager was developed by Bram van der Vlist and Rick van de Westelaken. This post archives their effort and aims to make it available to a larger number of Lego users.
Hi,
the example is very nice. I now use lejos 0.6 and if I try to link nnTest I get the following error message:
leJOS NXJ> Linking…
an error occurred: Unsupported ldc in lejos.nxt.Button:loadSettings.
The following features/conditions are currently unsupported:
– Arithmetic or logical operations on variables of type long.
– Remainder operations on floats or doubles.
– Too many locals ( > 255).
– Too many constants ( > 1024).
– Too many static fields ( > 1024).
– Method code too long ( > 64 Kb!).
What lejos platform should be used with the example?
Regards
Rainer
The Mindstorms NXT 8527 is my cup of tea. Simple enough for a ten year old, but challenging enough to allow continual growth in the robotics area. Your article mentions PC, but it is Mac compatible as well, right?
This application is very interested in. I try do design to application in biomedical. How do you thing about that ? It is possible ? If you can give me some idea ? Thanks !
i have a error every time i tried to run the “neuralnet.jar” file
it says “failed to load main-class manifest attribute from neuralnet.jar”
someone know how to solve it?
Hi,
Great article and I am eager to use this application, however I am running into a couple of problems:
“failed to load main-class manifest attribute from neuralnet.jar”
I receive the same error with the Jar file provided.
Additionally, when trying to compile the source, eclipse throws an error that the catch statements within connectUSB()/connectBT are unreachable. I have removed this but it seems to produce more errors.
Any ideas?
What documentation is available with the Java source files? All can see are java files, no instructions on what you’re suppose to do with them. You really should explain that part better IMO.