
I motorised Bluebrixx’s V100 LEGO train with some Mindstorms motors and sensors. The train worked well during the Model Train Show for two days. I documented the major technical challenges and solutions.
Tag: lego
Introduction to LEGO Train Automation
Many traditional model train sets feature advanced computer-controlled automation. The LEGO company still has to reach this level of sophistication. But we can always rely on dedicated AFOLs to fill the gaps. This post will introduce some of the solutions available in the market. The goal is to find the right combination of hardware and software to achieve your train project. I have been able to control four trains on what continues track without crashes.
Trains
There are many original LEGO trains available, but there are even more interesting ones available from alternative brands/resellers. Just have a look at BlueBrixx’s train section. It comes down to your taste on what exact train model you prefer.
Train controllers
More critical are the train motors and train controllers. After all, you want to control the train(s) remotely. The most popular approach uses Bluetooth to communicate with the train controller. The Powered Up Bluetooth HUB train controller and motor are the obvious choices for this approach. Alternatively, you can use the Technic Hub or the Spike Hub.
But there are other options. You can also use the SBrick Plus to control LEGO Power Functions train motors. You can also use Mindstorms as your controllers. For example, you can use the EV3 with a custom cable. Or you can build your own train motor engine.
Tracks
The original LEGO tracks are the go-to choice for many, but there are other legitimate options. Bluebrixx sells their own tracks at a much better price. They are not the only ones. There is also Modbrix, Trixbrix and 4DBrix. Some of the less common tracks are produced using 3D printers. You can also just download the 3D fiels and print them yourself.
You can of course, also visit Aliexpress to get a large variety of cheap tracks. The number of different designs availale is just amazing. LEGO is again falling behind.

Switches
You do not only want to control your trains but also the track itself. You can build an automated switch with original LEGO bricks. You will connect these switches to LEGO hubs that you can then control just like the trains. 4DBrix offers a complete automation system that also includes motors that are mounted on top of your original LEGO switches.
Sensor
To control the train, you need to know where they are on the tracks. You can add sensors to the train, such as a light sensor or a distance sensor. You can then place markers on the tracks, such as colourful plates (light) or walls (distance). The sensor depends on what controllers you use. The sensors typically originated from the different versions of Mindstorms. While driving over the marker, the train senses this information and can act upon it. You need a programmable hub, such as Mindstorms, to process the sensory input and act accordingly.
Alternatively, you can mount sensors to the track itself. This can again be original LEGO sensors (light or distance) or you can use 4DBrix’s sensor in combination with their whole system.
Controllers
If you use a distributed architecture, then you need the train controllers to communicate with the track controllers. At least one of them needs to be programmable so that it makes decisions. Alternatively, you can use a computer as a central controller that communicates with all components in your train system. This can be done wirelessly (Bluetooth, Infrared, or Wifi). Other systems, such as the 4DBrix System, use wires for all track-mounted sensors, switches and actuators. Alternatively, you can consider the MattzoController system, but it does require more knowledge in programming micro controllers. Anopther option is the TrixBrix system, but I am not sure how much it can be programmed.
Software
You will need software to make all the decisions in your train system. Based on sensory input from your train or track sensors your trains need to start/stop. Also, switches need to be triggered, booms lifted and decouplers triggered. The 4DBrix system uses the nControl™ software running on a computer to plan and program your train system.
The Brickrail software is based on PyBricks to program hubs/controllers. Another option is the Brick Automation Project, although it does not seem to have been updated in a while.
Computer
Depending on what controllers you choose, your computer needs to have USB, WiFi and Bluetooth. The latter is a bit more tricky than normal. You specifically need a Bluetooth Low Energy Dongle that integrates all Bluetooth LE features. If your computer does not have it built in then you need an external dongle.
New edition of LEGO color guide available

The sixth edition of the Unofficial LEGO Color Guide is now available. The book is available as a paperback and hardcover from Amazon.com. An eBook (PDF) is available from Lulu. This revised and extended edition includes several new colors. It also is printed in IngramSpark’s new Ultra Premium Color printing process.
Drawing LEGO Bricks in LaTeX
Sometimes the star align and bring together several of your passions. I love LEGO and I love LaTeX. Thanks to Sam Carter and his TikZbricks package, you can now draw LEGO bricks directly in LaTeX. Let’s start with a simple example of drawing a single 2×4 brick:
\documentclass[a5paper]{article}
\usepackage{tikzbricks}
\begin{document}
\begin{tikzpicture}
   \brick{4}{2}
\end{tikzpicture}
\end{document}
This will be rendered as:
TikZbricksLEGOLaTeX01It is possible to build whole models with this package. The LEGO company created its first augmented reality puzzle game that used a mobile app in 2011. It was called Life Of George. This seems like a perfect example for putting TikZbricks to the test.
\documentclass[a4paper]{article}
\usepackage{tikzbricks}
\definecolor{lego-white}{rgb}{0.95, 0.95, 0.96}
\begin{document}

\begin{wall}
    \wallbrick[color=black]{2}{1}
    \addtocounter{brickx}{1}
    \wallbrick[color=black]{2}{1}
    \newrow
    \wallbrick[color=blue]{1}{1}
    \addtocounter{brickx}{2}
    \wallbrick[color=blue]{1}{1}
    \newrow
    \wallbrick[color=blue]{4}{1}
    \newrow
    \addtocounter{brickx}{-1}
    \wallbrick[color=lego-white]{1}{1}
    \wallbrick[color=red]{4}{1}
    \wallbrick[color=lego-white]{1}{1}
    \newrow
    \addtocounter{brickx}{-1}
    \wallbrick[color=red]{1}{1}
    \wallbrick[color=red]{2}{1}
    \wallbrick[color=black]{1}{1}
    \wallbrick[color=red]{1}{1}
    \wallbrick[color=red]{1}{1}
    \newrow
    \addtocounter{brickx}{-1}
    \wallbrick[color=red]{3}{1}
    \wallbrick[color=black]{1}{1}
    \wallbrick[color=red]{2}{1}
    \newrow
    \wallbrick[color=lego-white]{4}{1}
    \newrow
    \addtocounter{brickx}{-1}
    \wallbrick[color=lego-white]{2}{1}
    \wallbrick[color=black]{1}{1}
    \wallbrick[color=lego-white]{1}{1}
    \wallbrick[color=black]{1}{1}
    \newrow
    \addtocounter{brickx}{-1}
    \wallbrick[color=yellow]{1}{1}
    \wallbrick[color=lego-white]{2}{1}
    \wallbrick[color=yellow]{3}{1}
    \newrow
    \wallbrick[color=yellow]{4}{1}
\end{wall}

\end{document}
This will be rendered as:
TikZbricksLEGOLaTeX02There are many more options, such as chaning the perspective and size of various components. But we will leave this for now and simply enjoy this moment.
Yellow-eyed penguin made with LEGO
Converting a 3D STL file to a LEGO model.
It has been some time since I designed this large scale model of a Yellow-Eyed Penguin for the Pop-Up Penguin exhibition. The model is 168cm tall and consist of approximately 60,000 LEGO bricks.
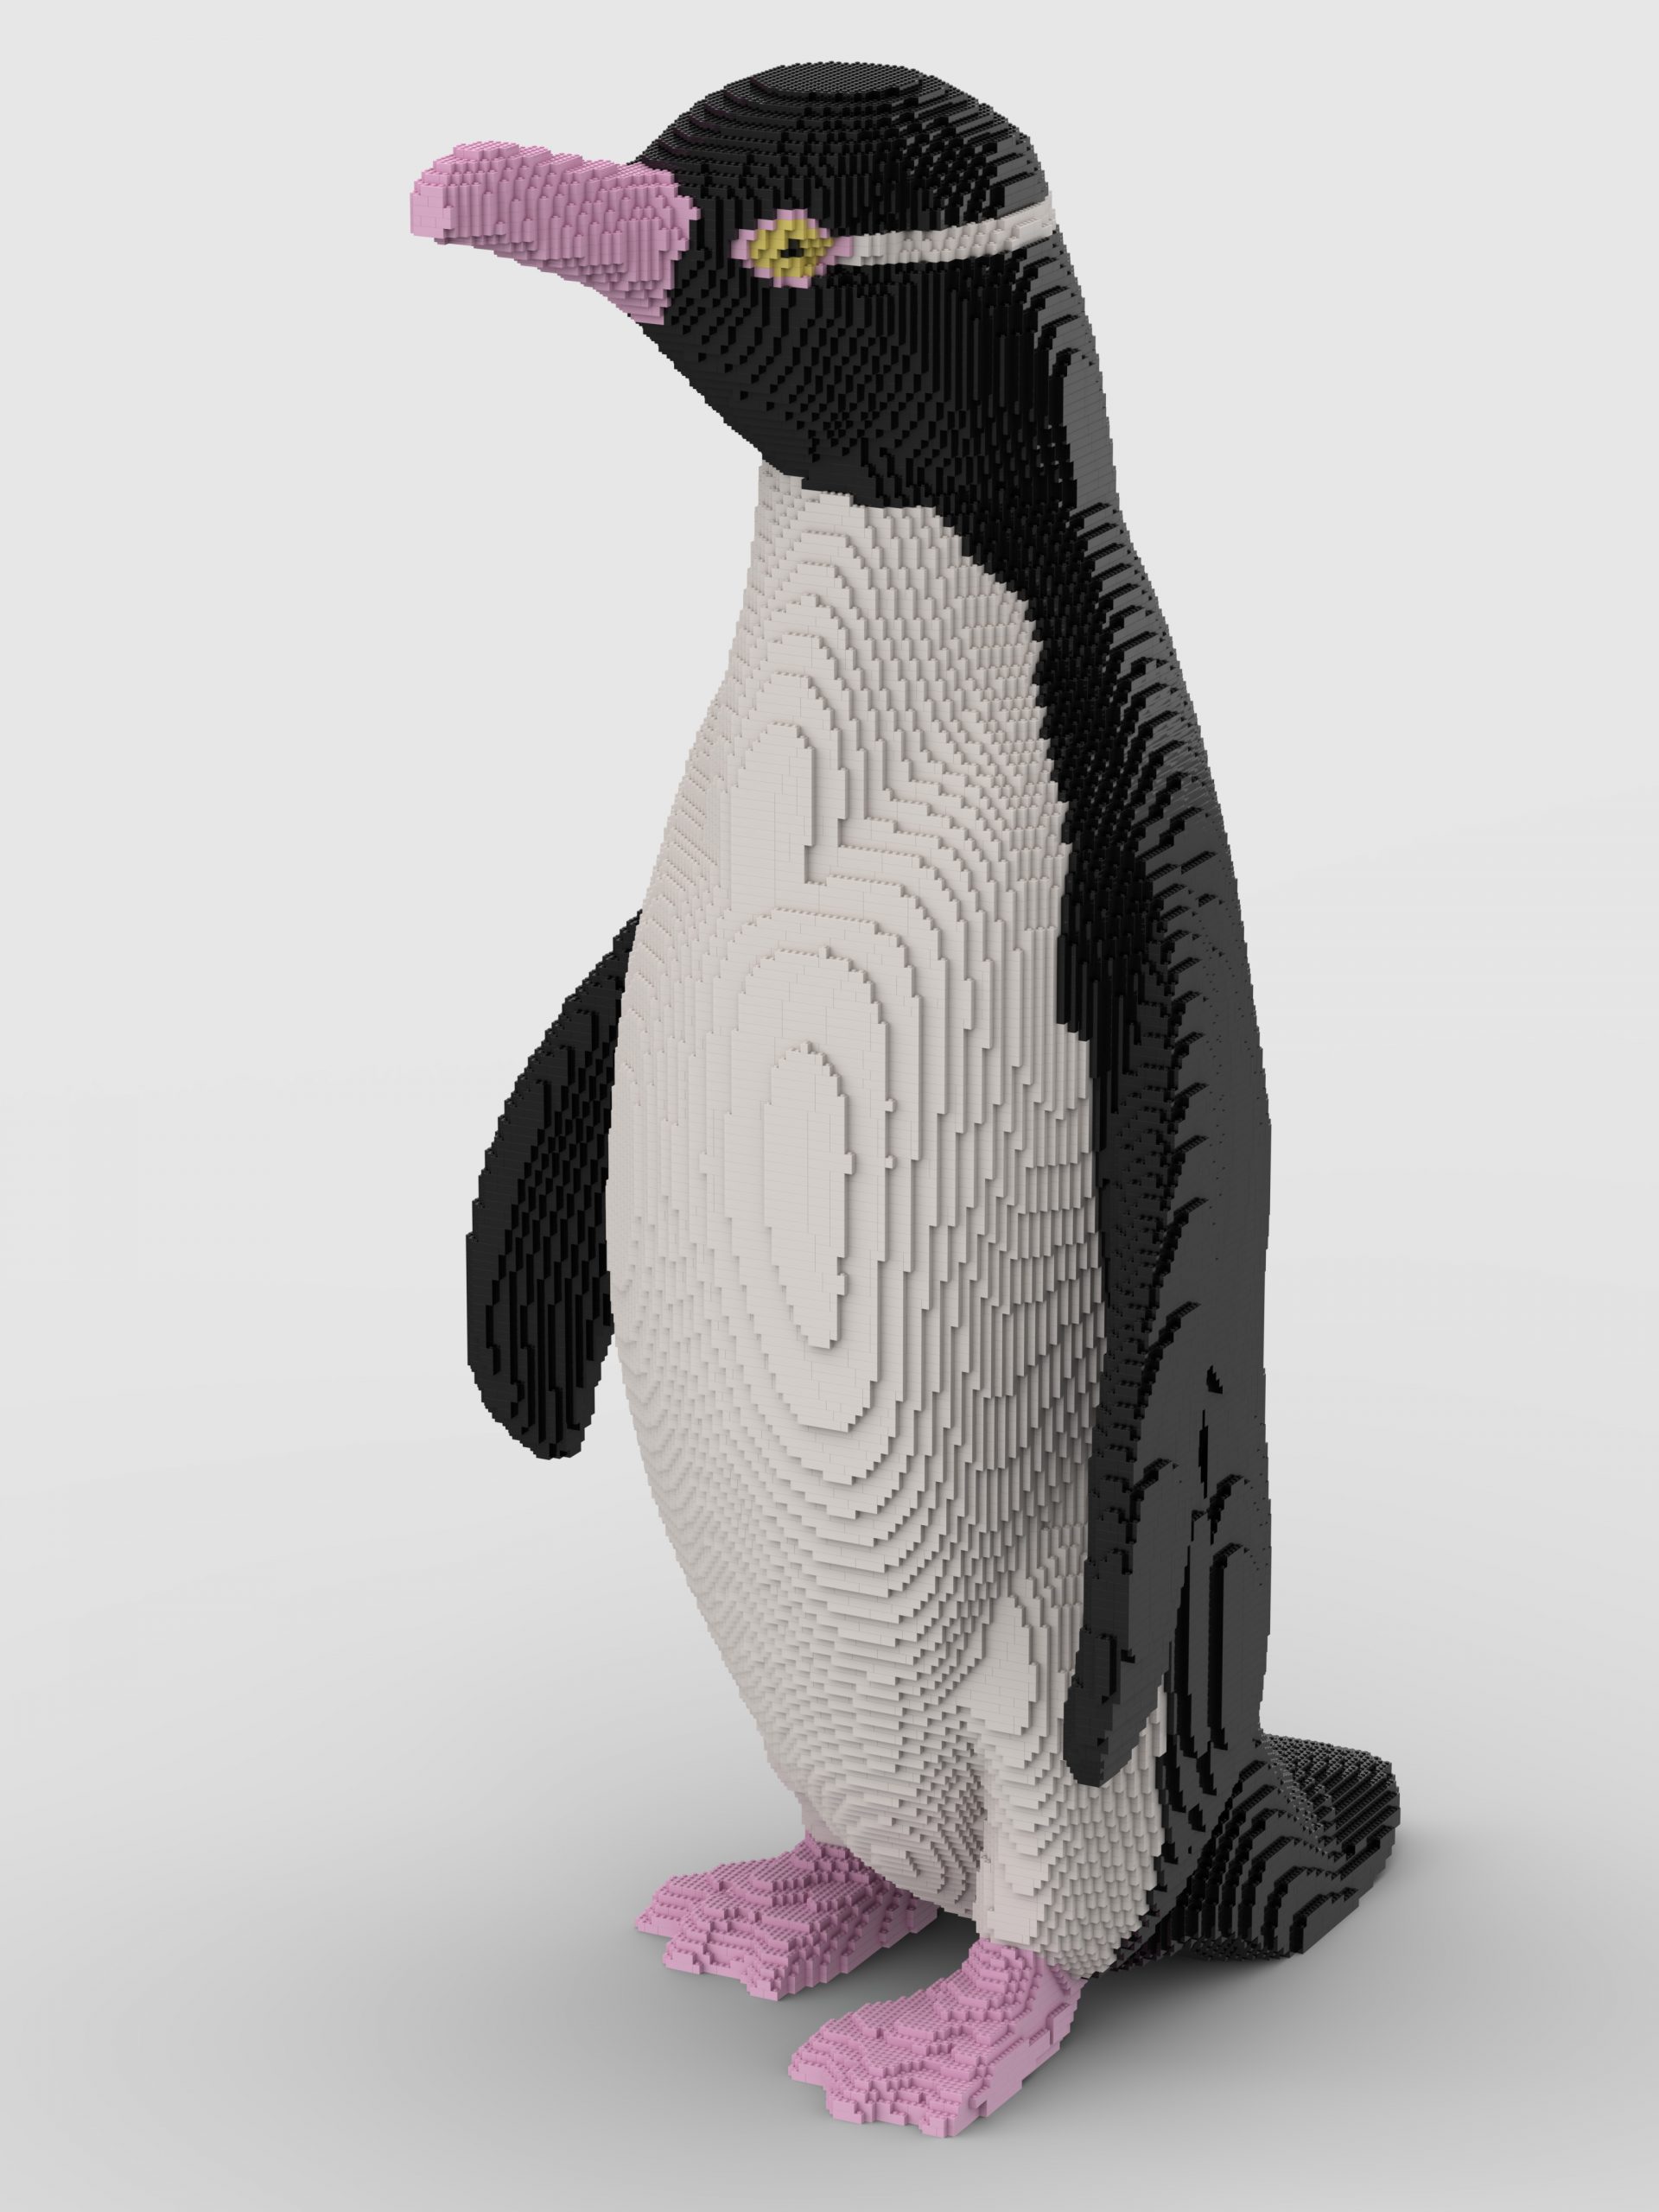
The organiser of the exhibition sent me the STL file of their fibre-glass penguin. I then used the brickplicator software to convert the 3D STL model into a LEGO 3D model that can be build. Since this was a very large model, Gerrit helped me a bit with the conversion. I then imported the model into Stud.io and rendered the model.
This does seem like a good workflow to convert existing 3D models of animals or any organic form, to LEGO models.