
The battery pack for our Aldebaran / SoftBank Robotics Nao V6 robot broke and we are currently not able to find a reseller that ships to our country. Even contacting SoftBank Robotics directly did not result in any response. The official specifications are available here. Since the battery pack was clearly broken we decided to open it up to be able to find a replacement battery ourselves.
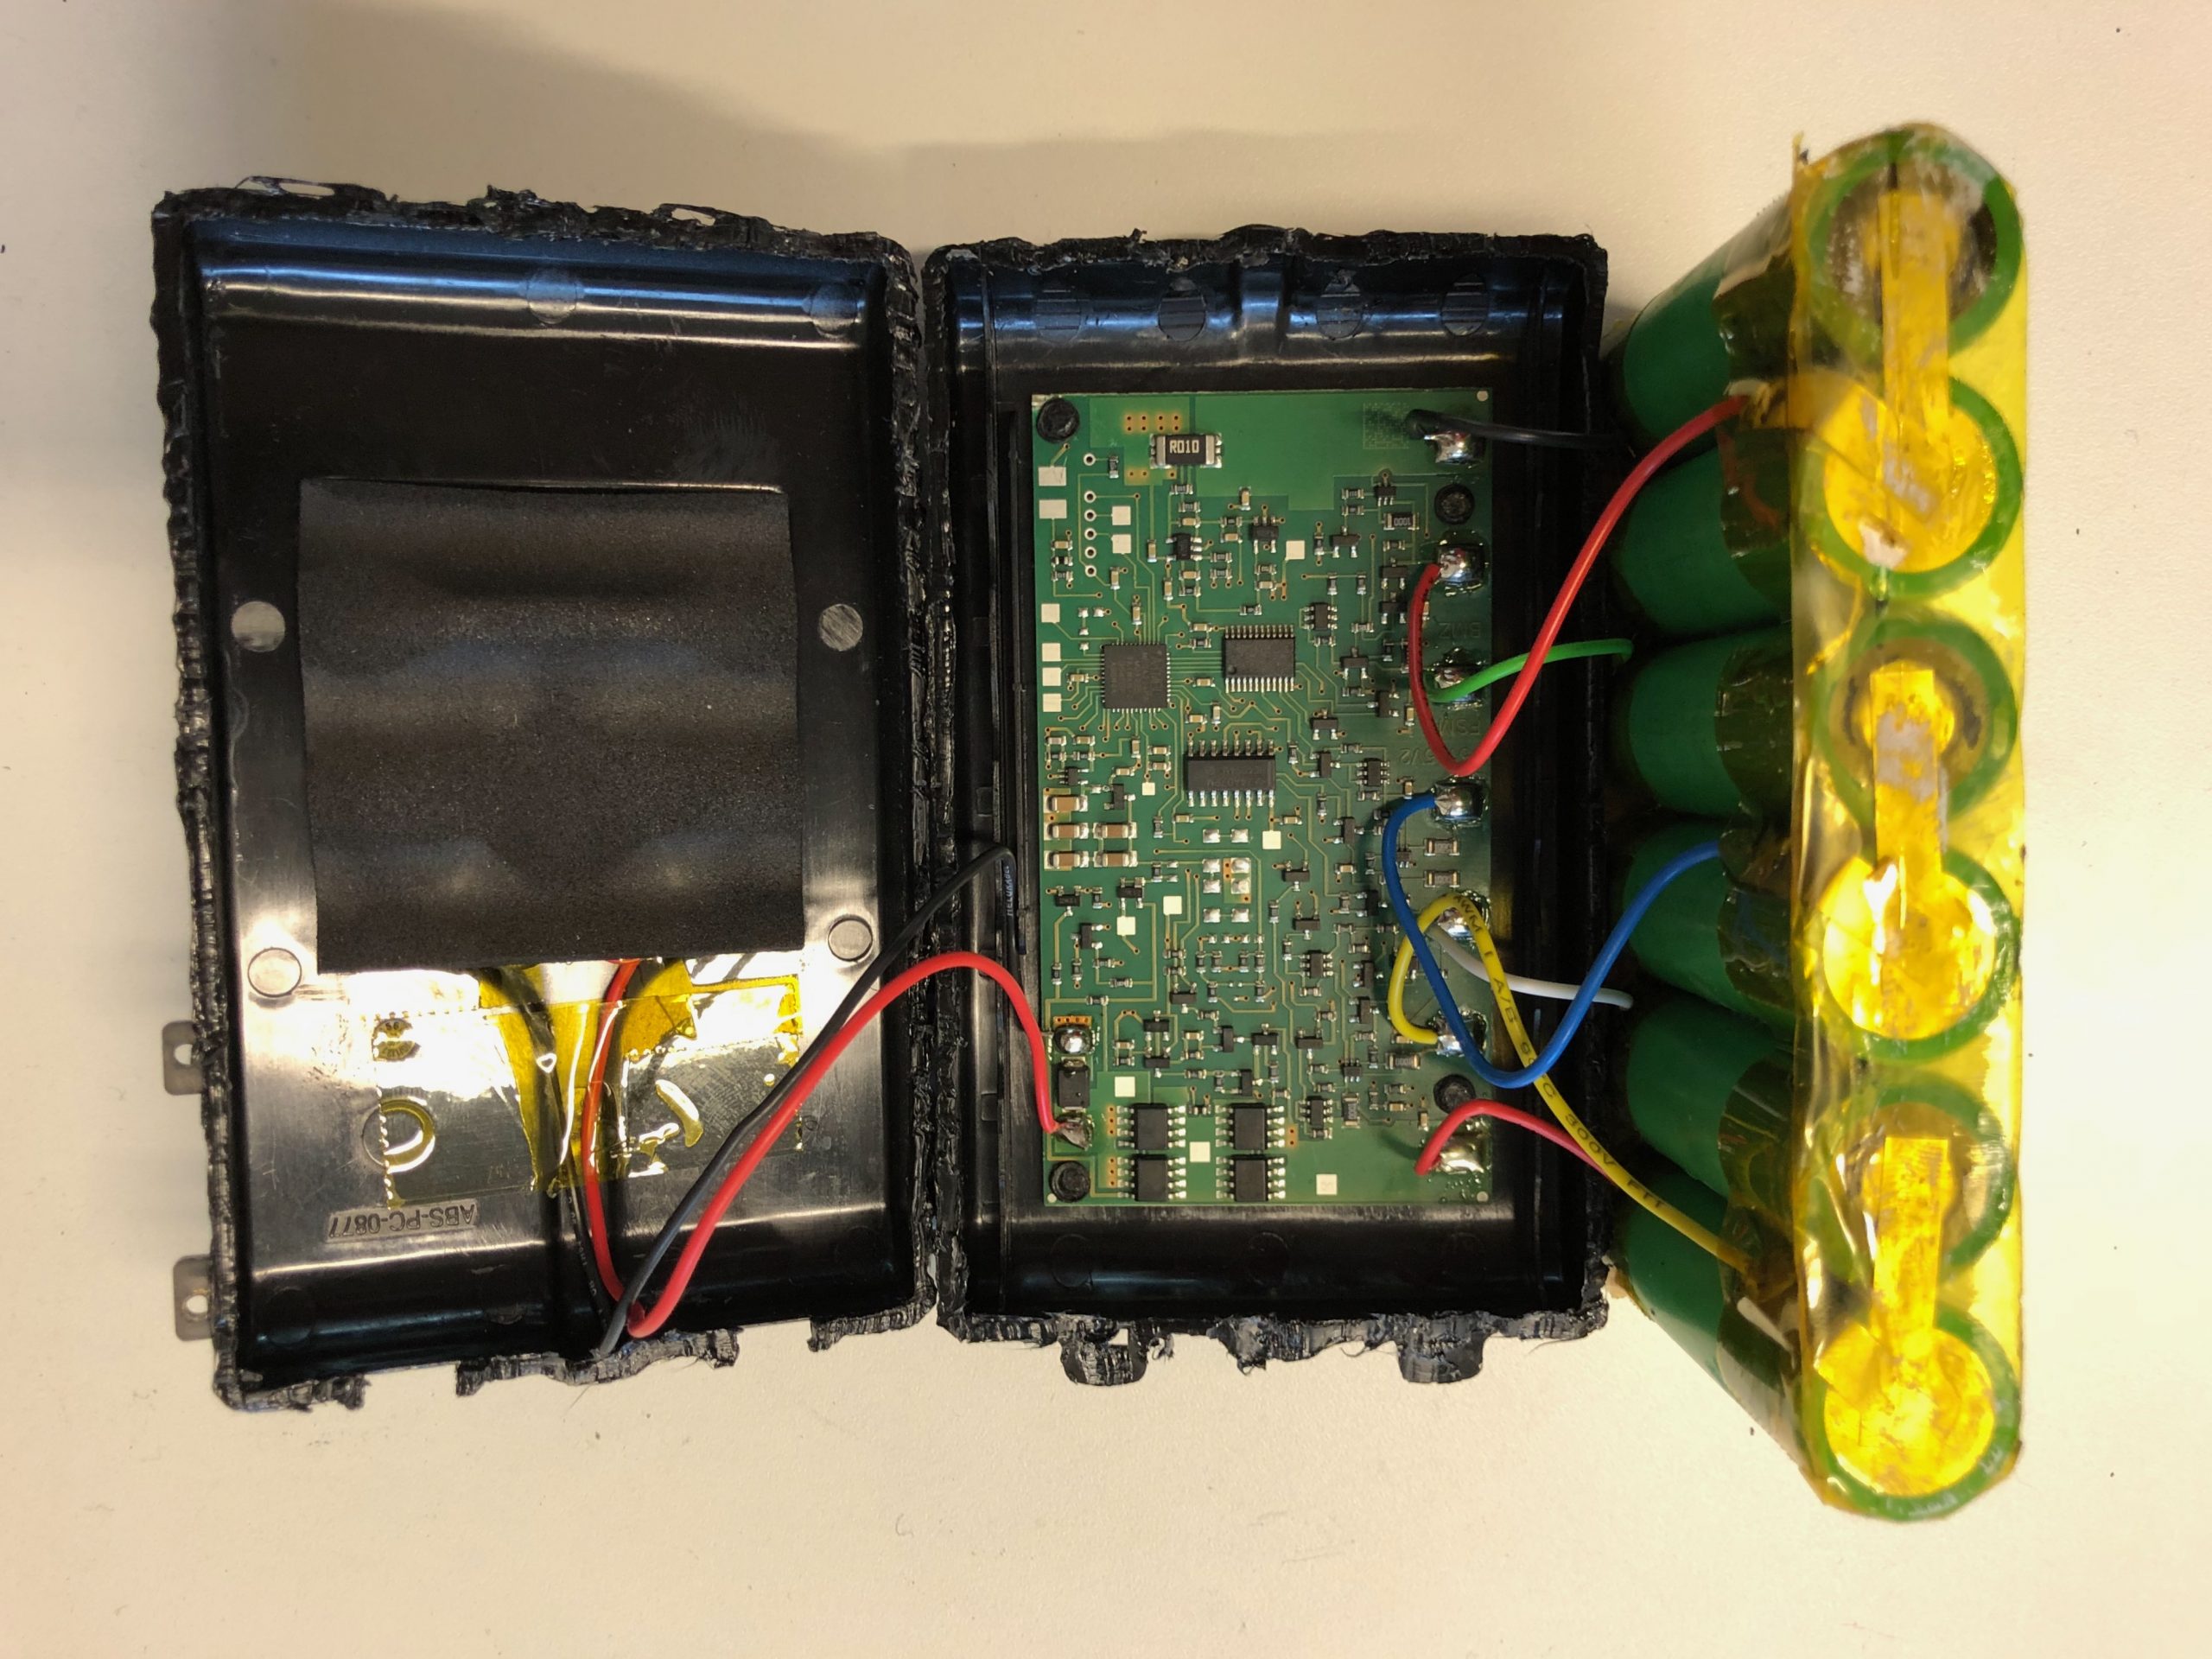
Opening the casing is difficult, since it is not only kept in place with latches, but is also glued together. We used a soldering iron at the seams to open open the case.
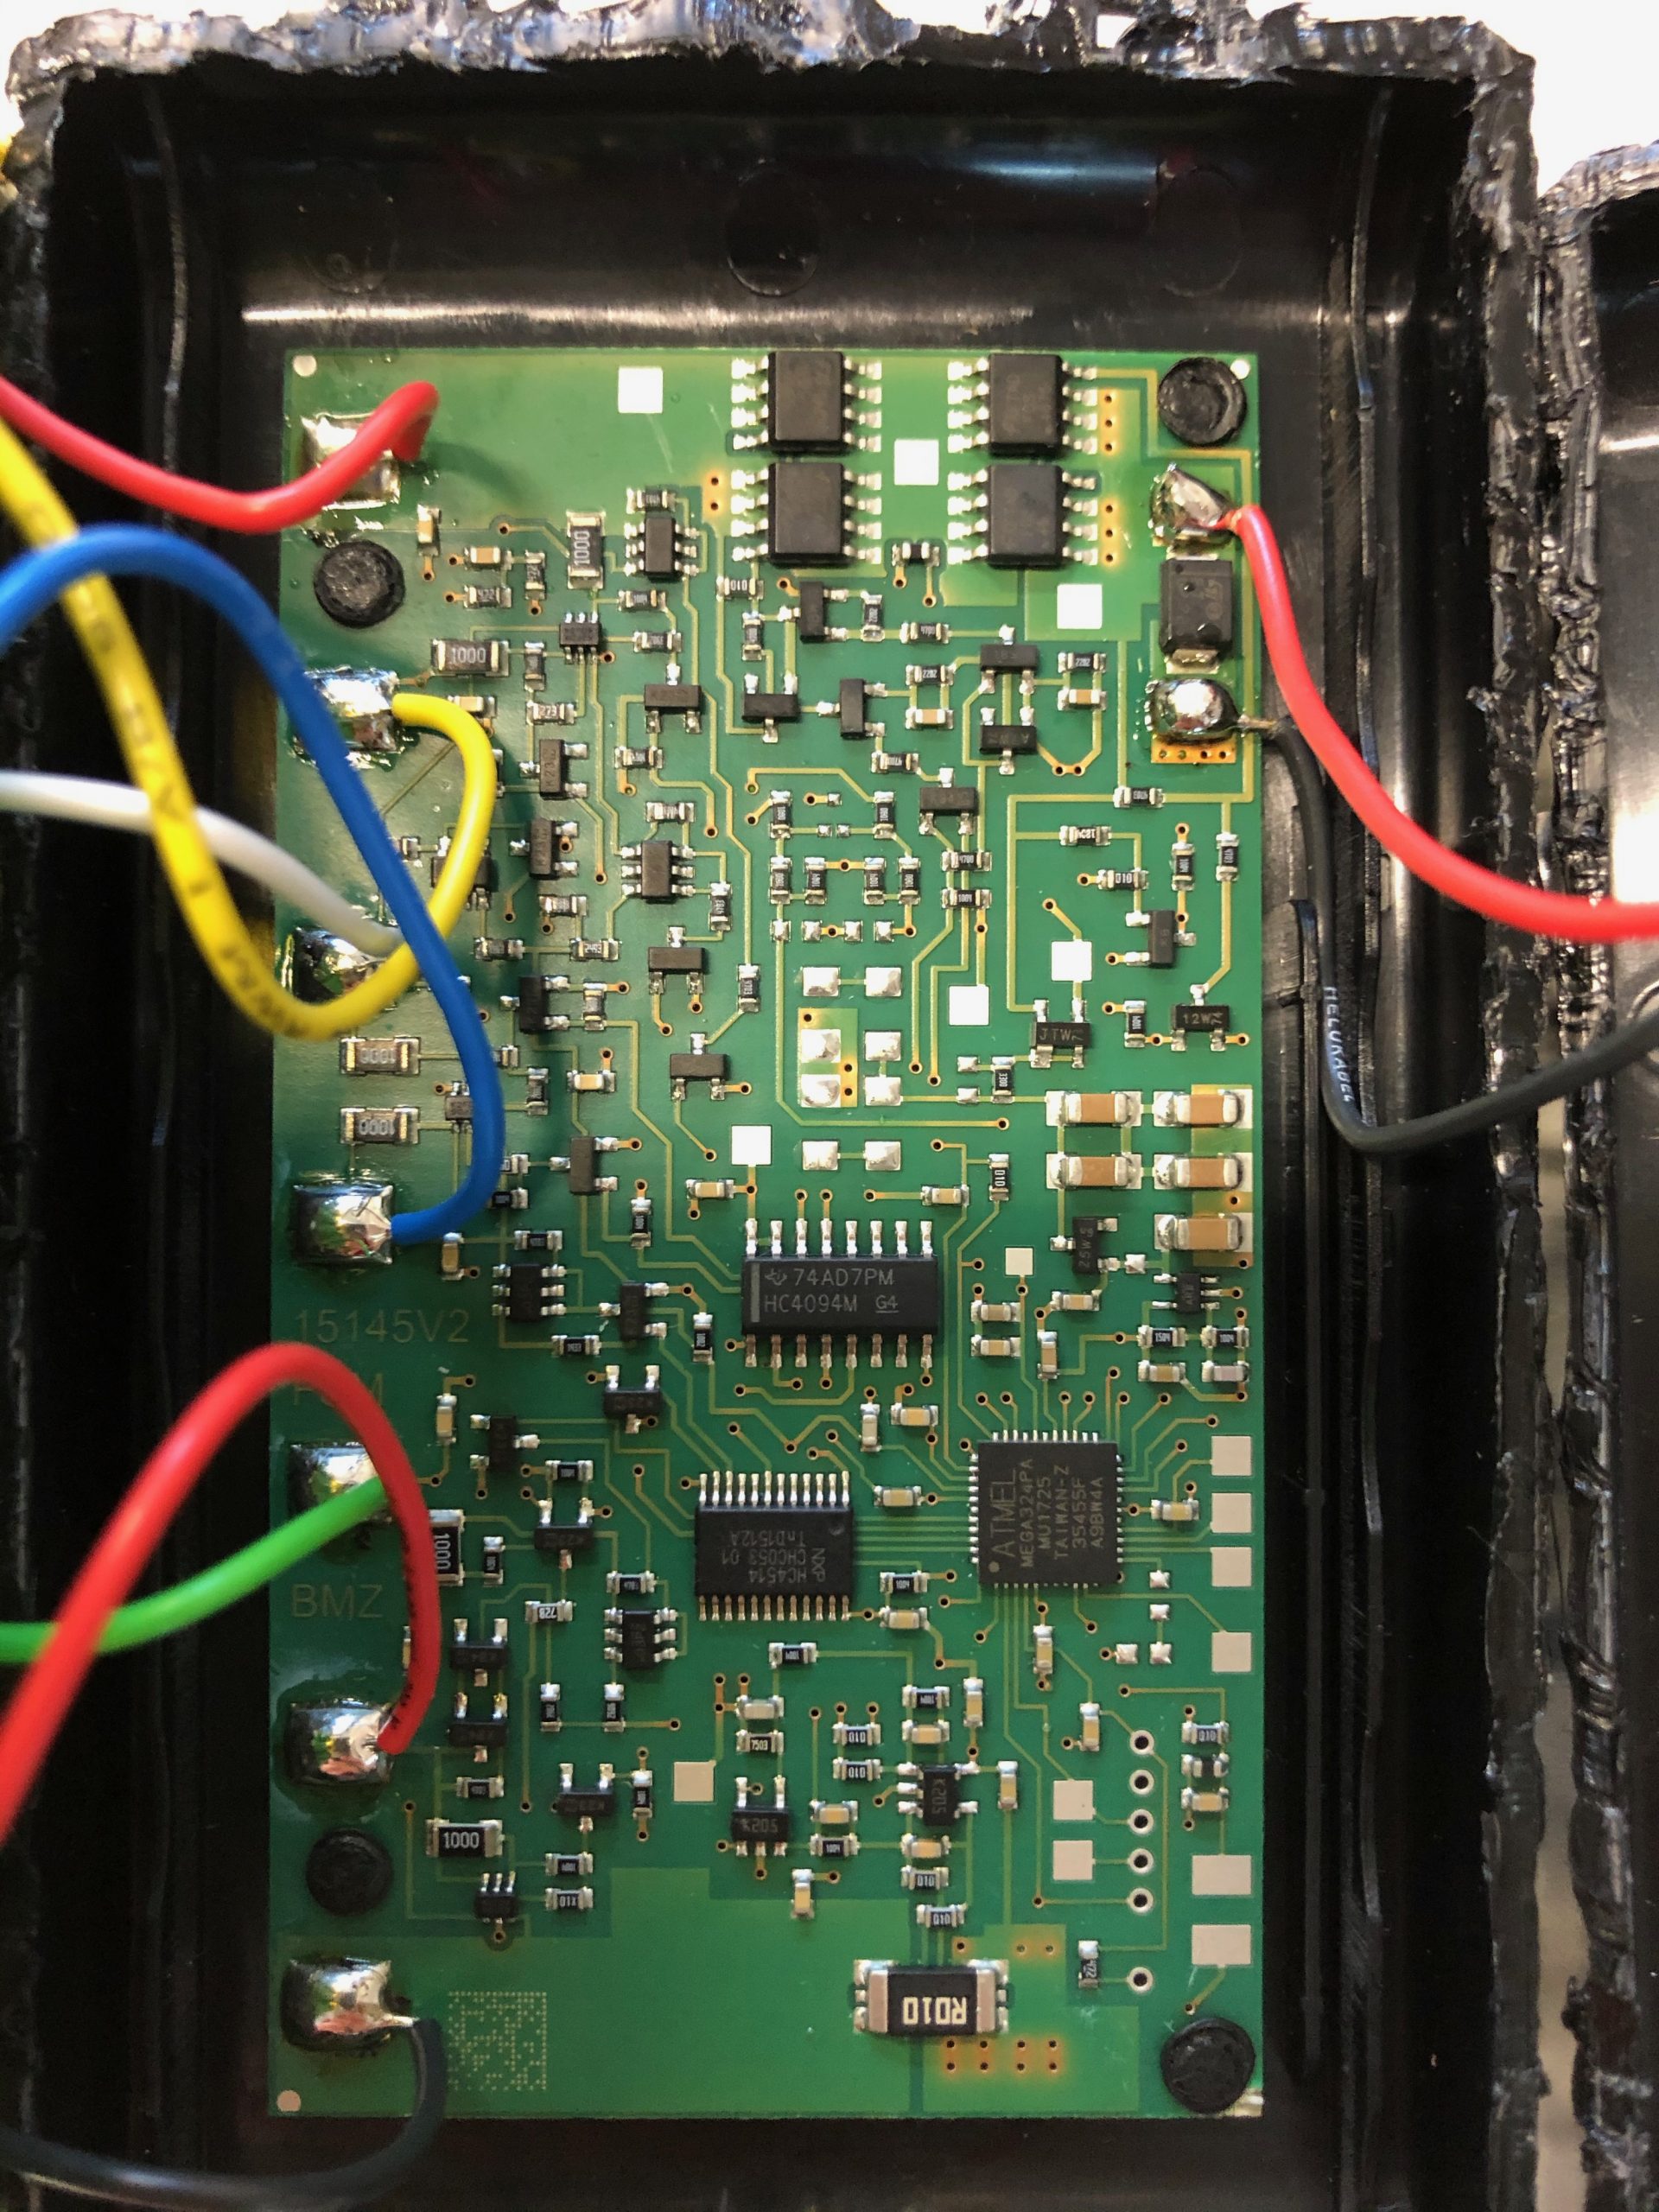
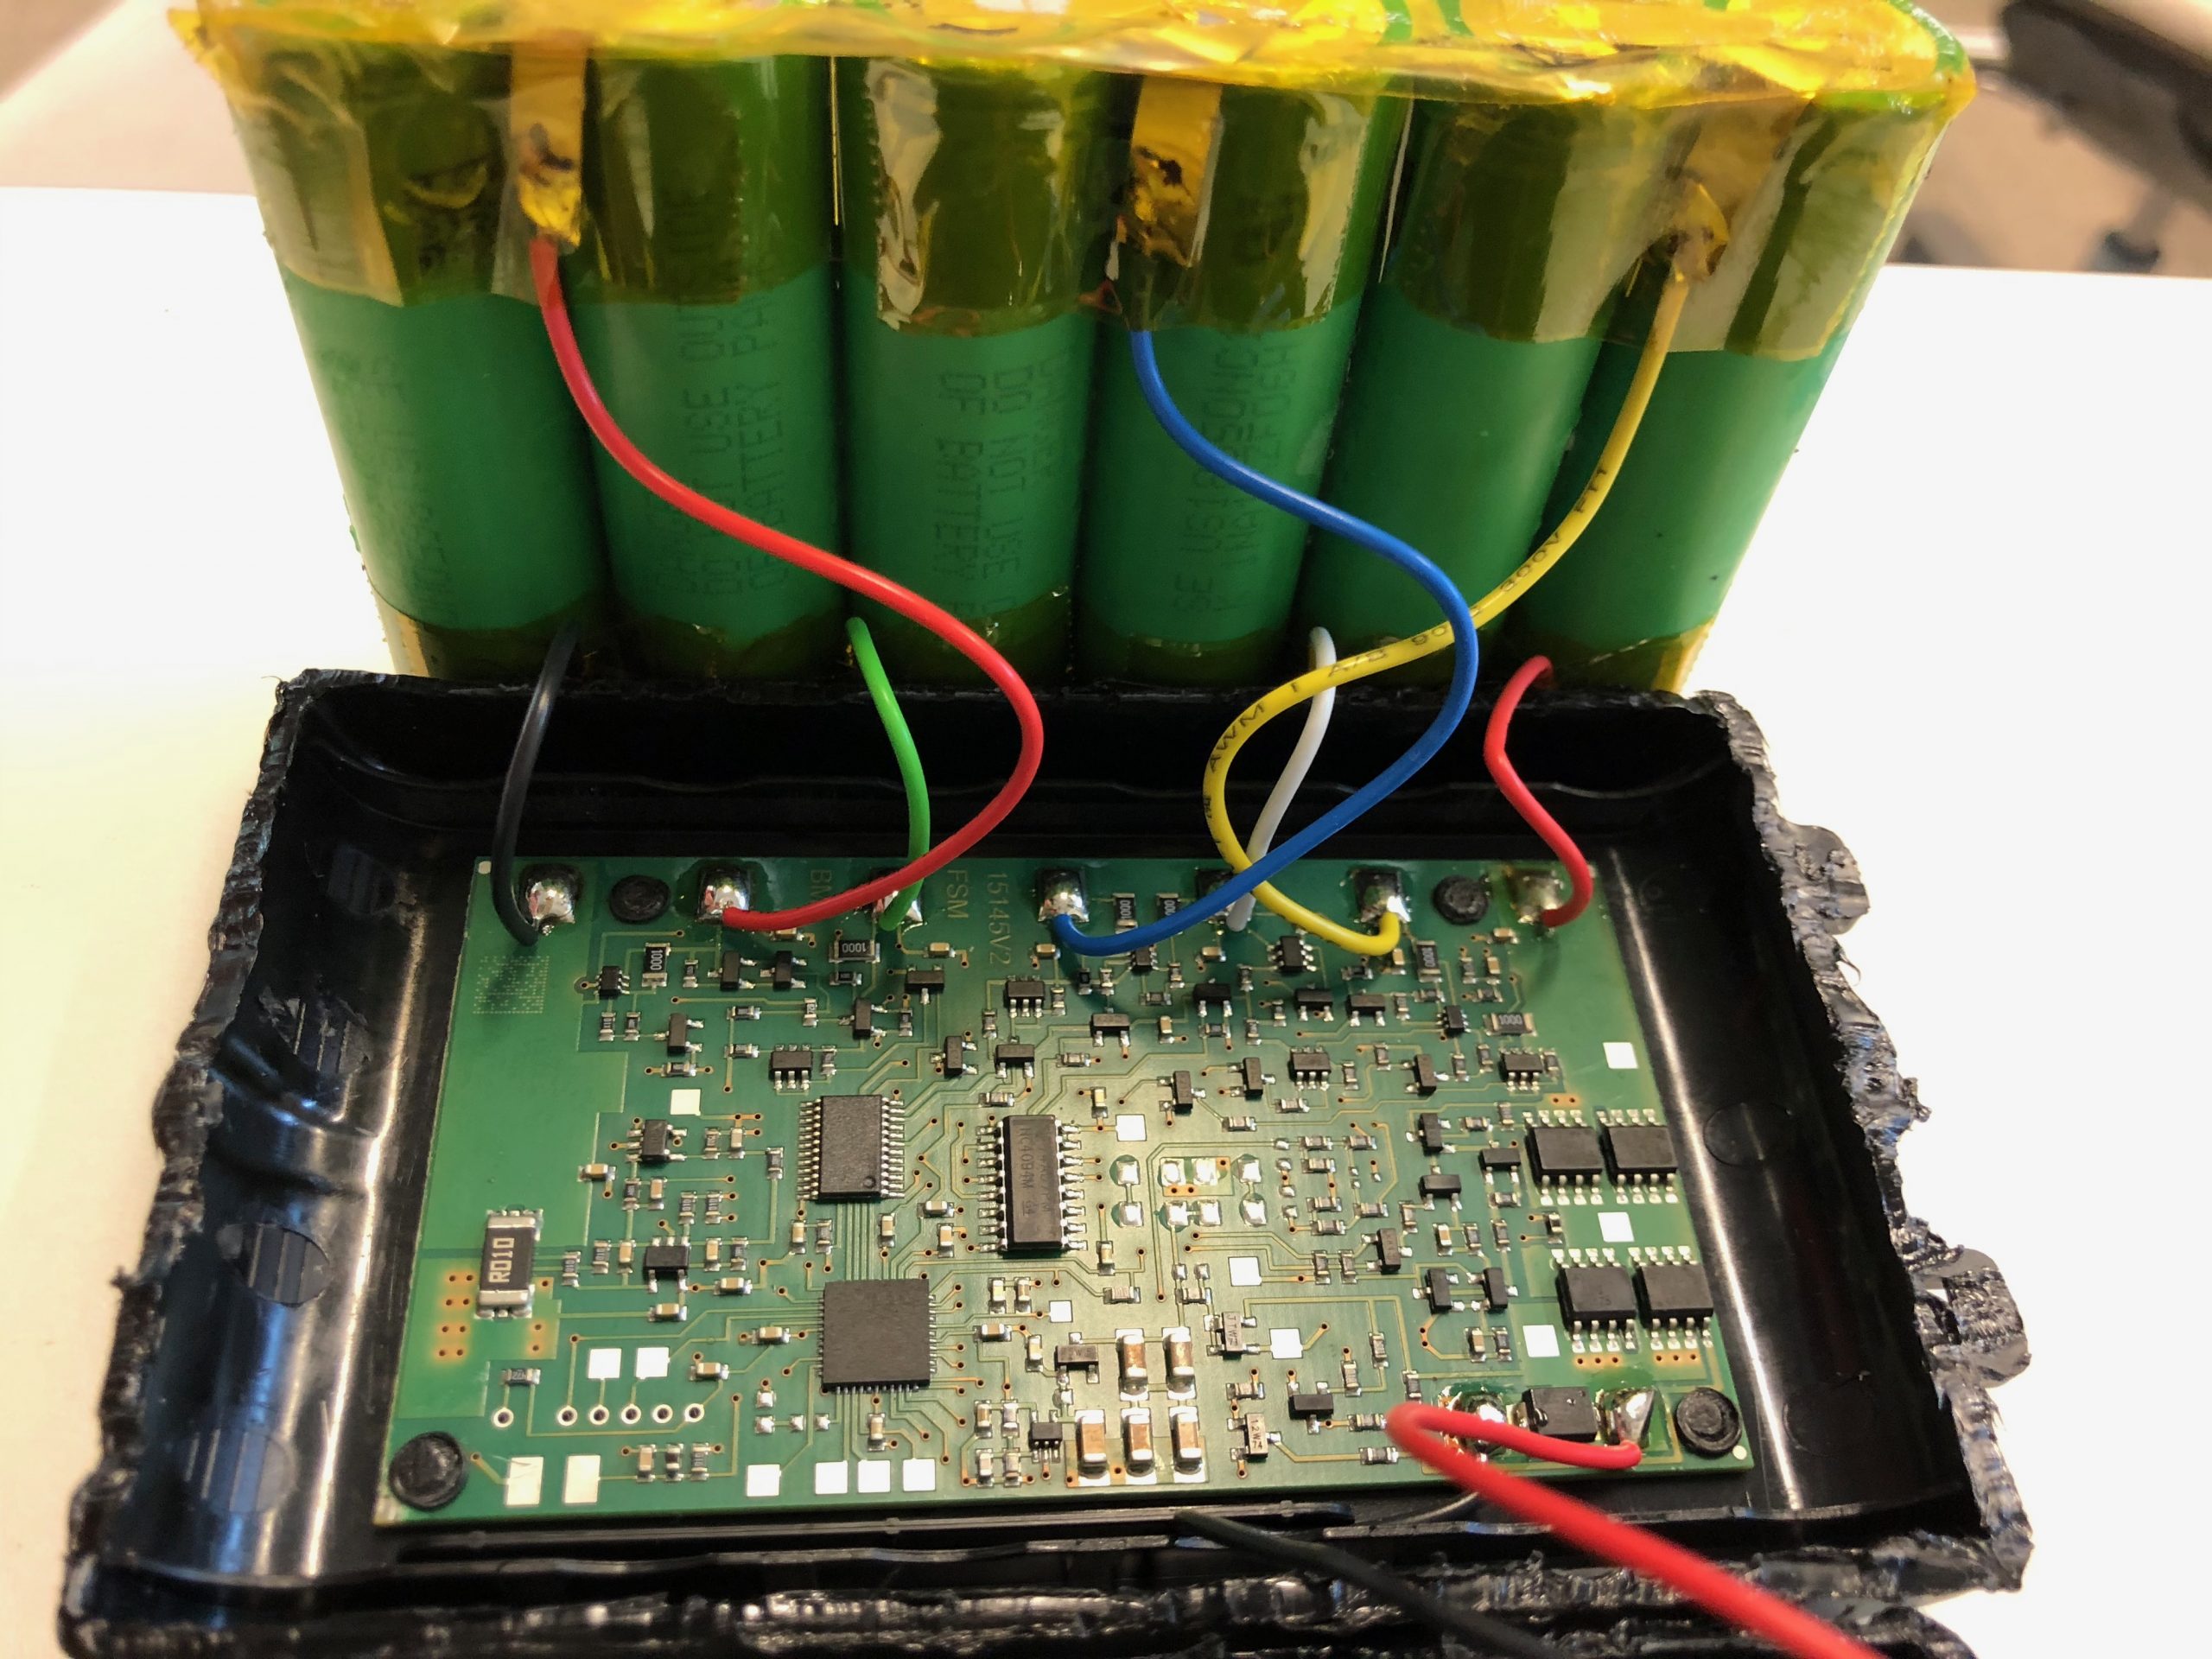
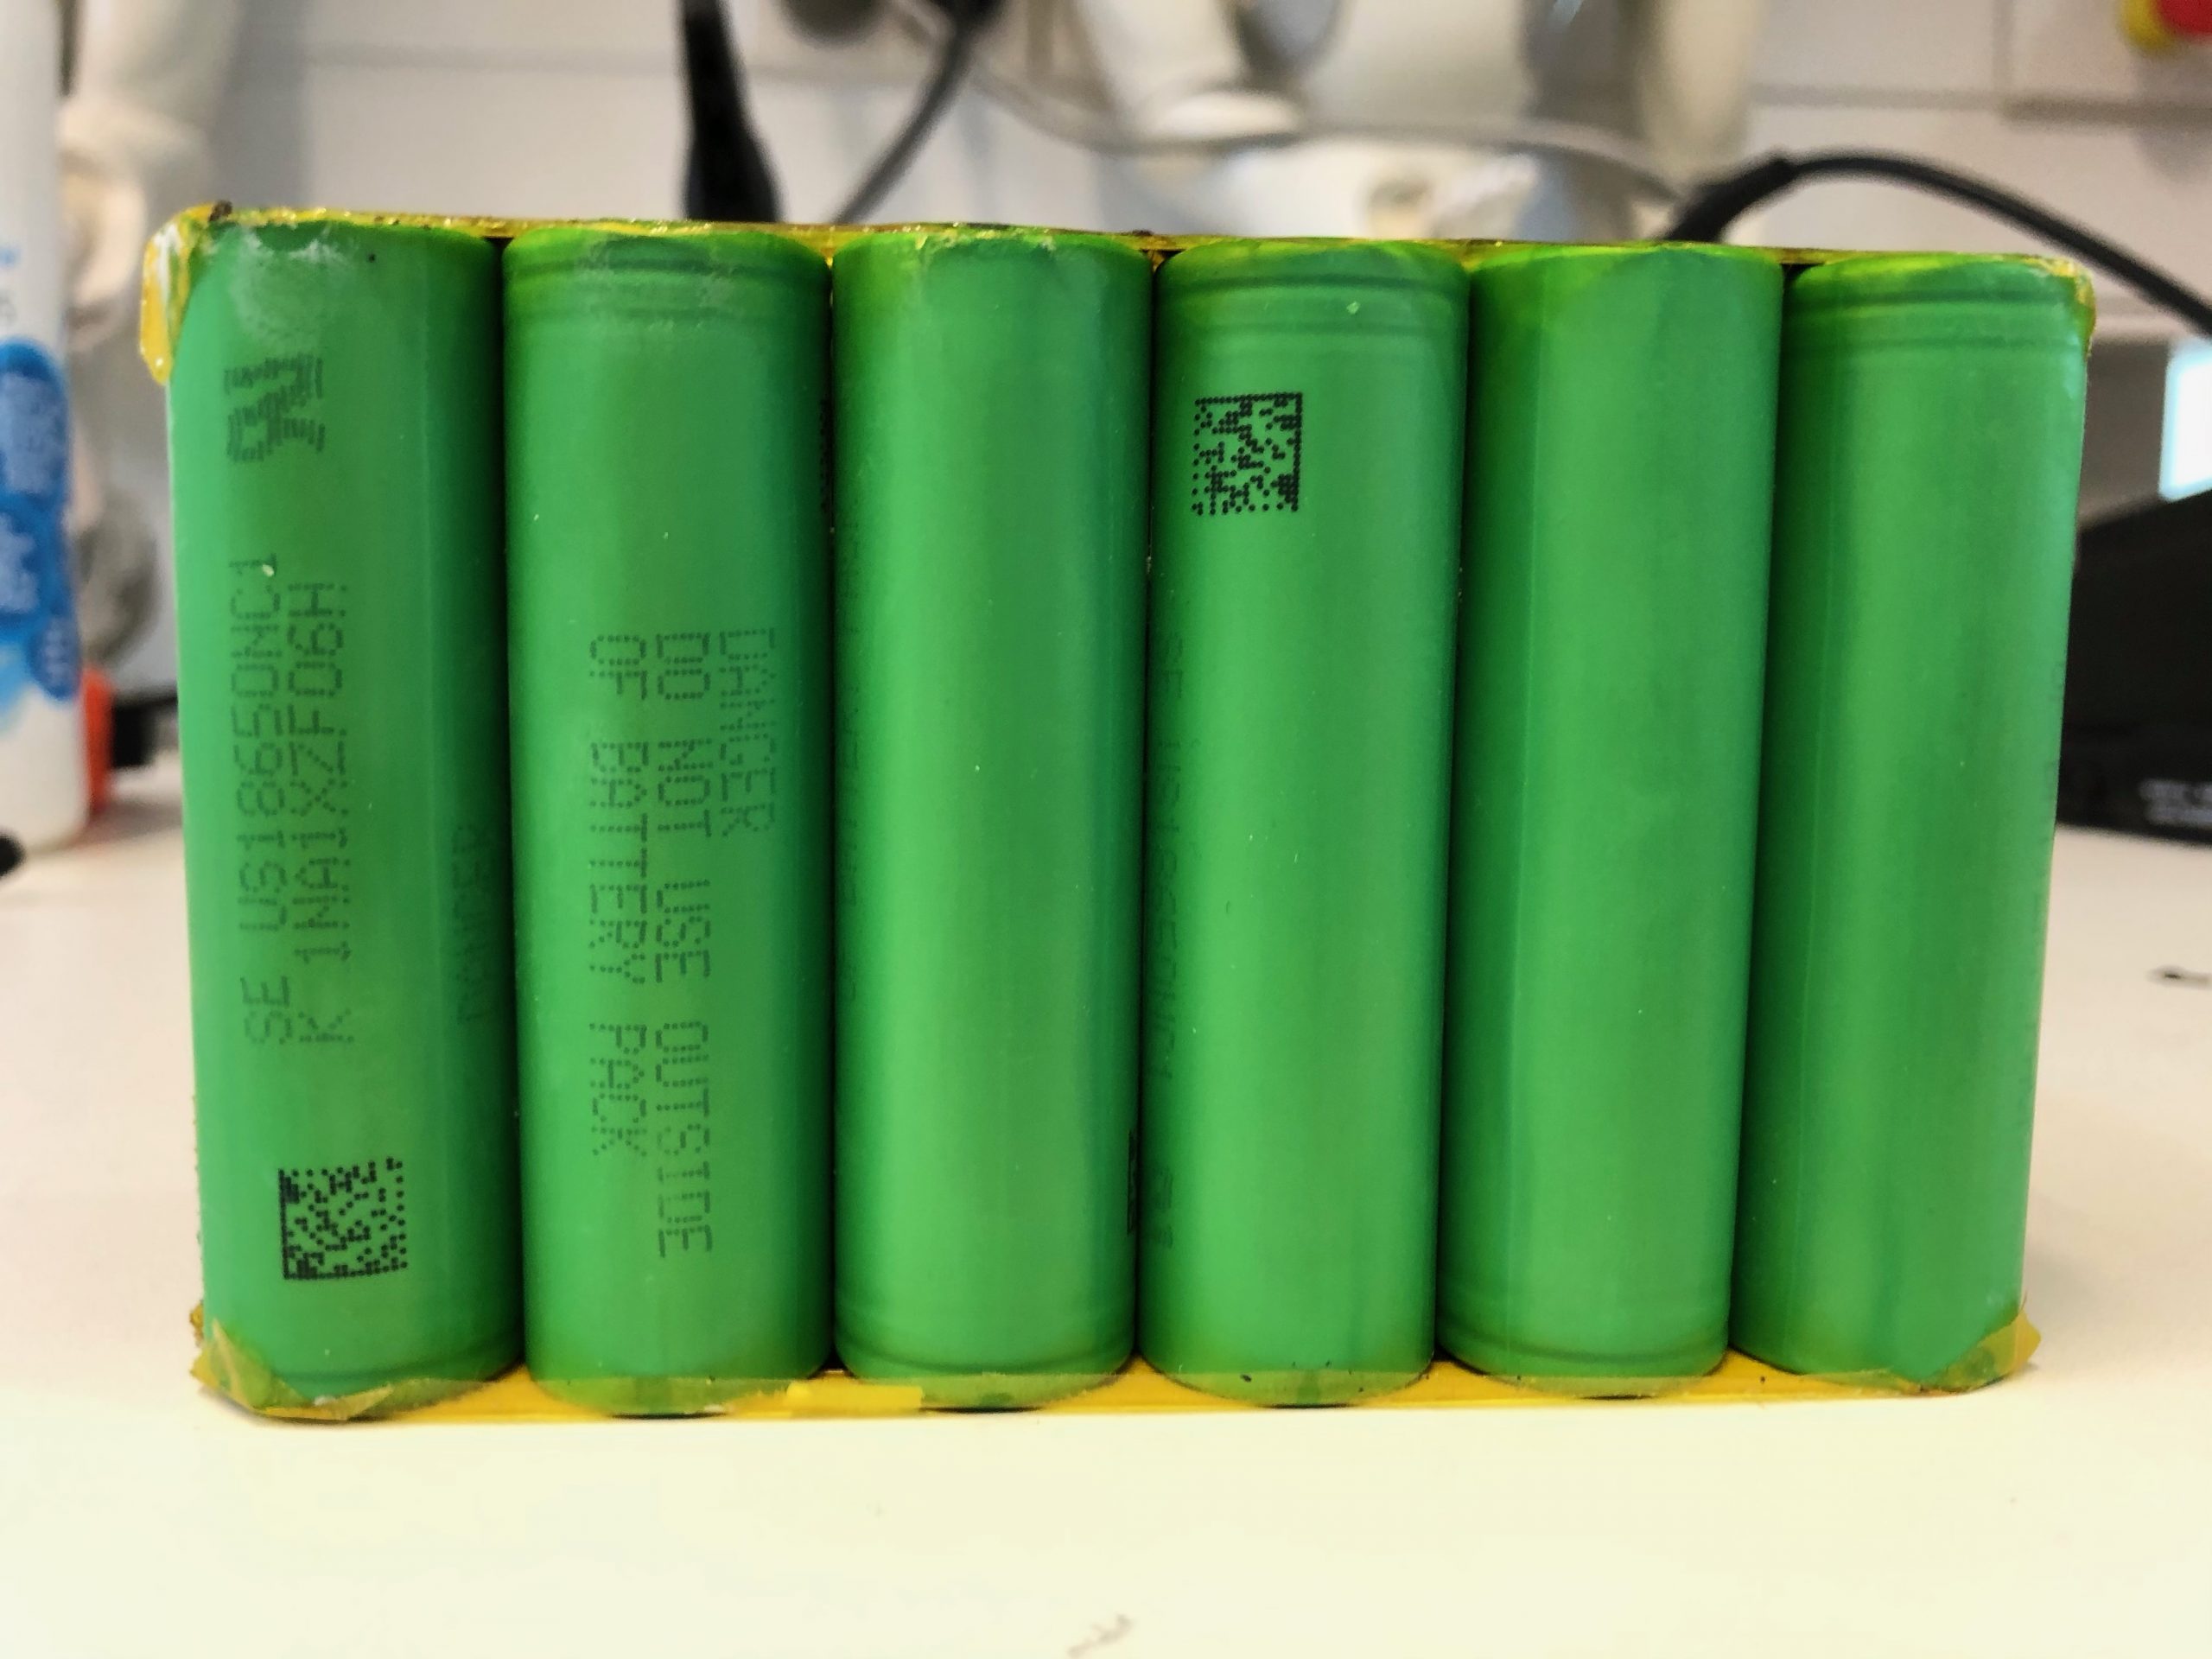
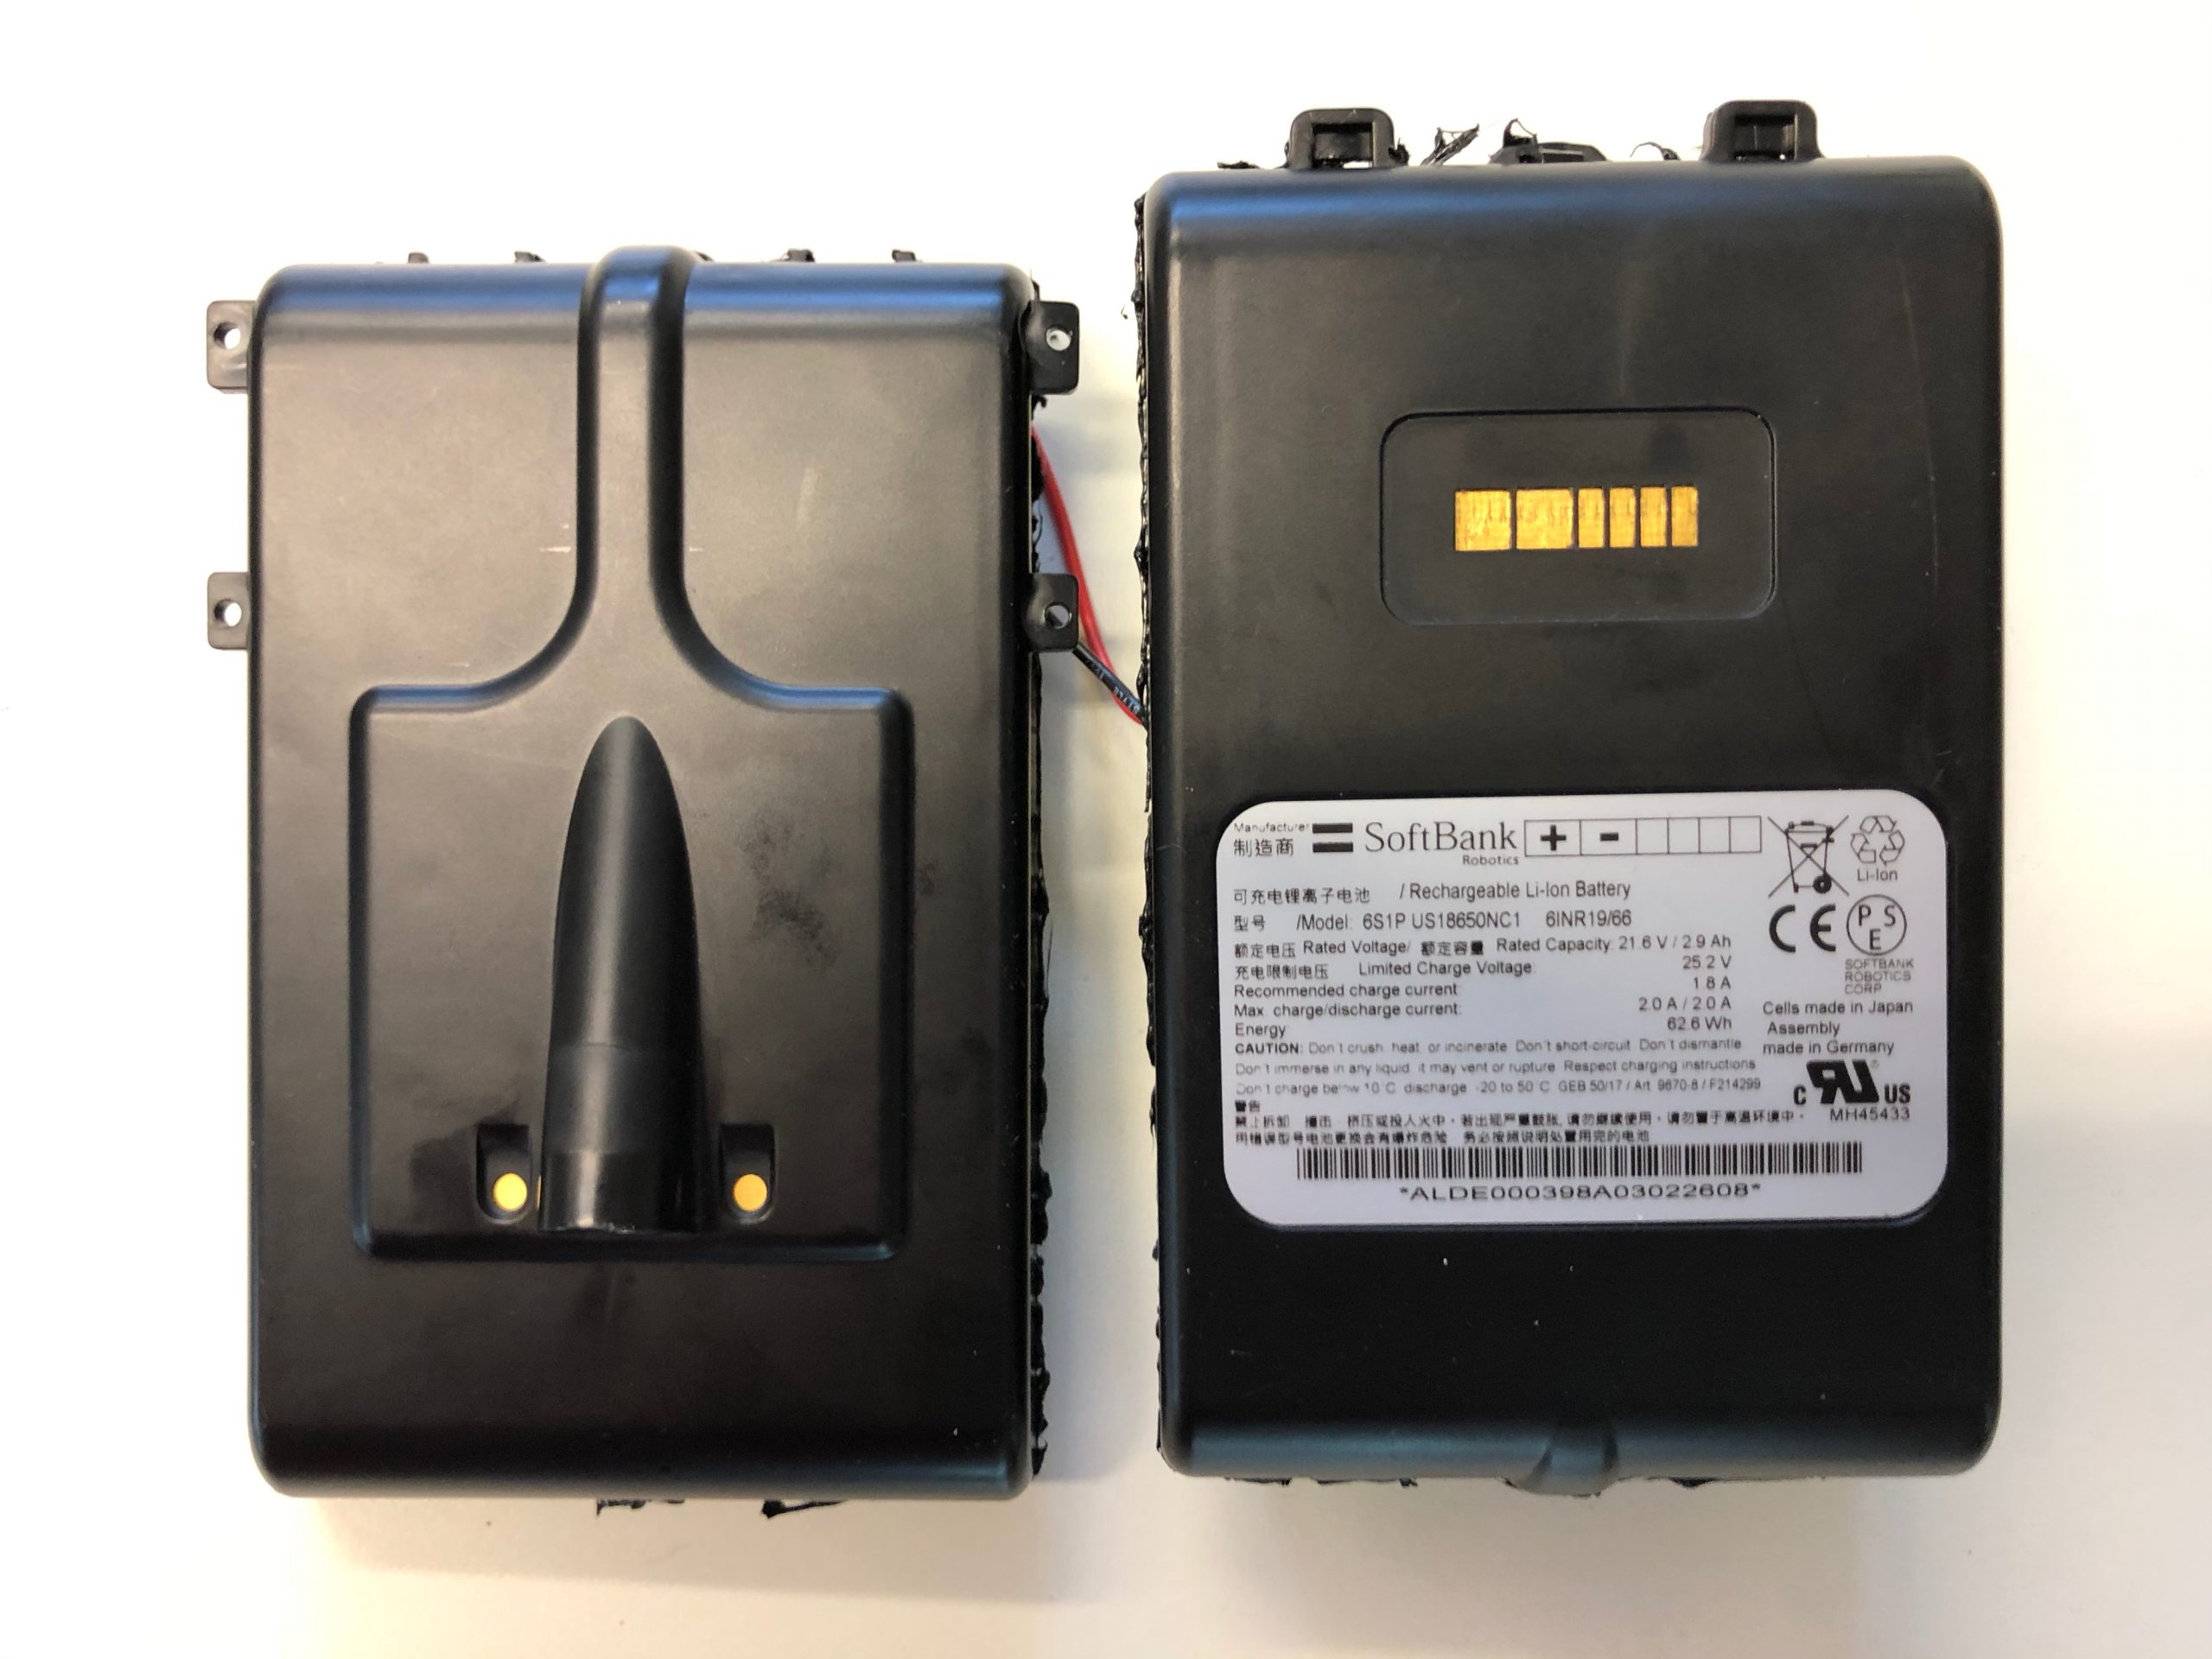
The battery back seems to consist of six Sony US18650NC1 2900mAh batteries. They are connected with seven wires to a PCB board. The power supply connects with two cables to the PCB board. In addition, the case has two contacts next the charger plug that could be used for detecting if the battery cover is closed. Five contacts connect the battery pack to the robot of which the first two bigger ones seem to carry the power. The four smaller contacts are probably to communicate with between the robot and the battery PCB board.
We ordered some new batteries and will keep you updated on the developments.
I am also looking for a replacement battery. Have searched many options.
Hello, I teach at an High school and we are facing same issue. Please let me know if your fix will work. Thank you.
Our battery pack died from lack of use. Replacements online range from $290~$490. Our NAO is a V5, the cells in the pack are grey; CGR18650CH. We’ve ordered 6 with solder tabs.
Hi, is there any update on how it went. I’m curious if I should try to do the same. Anyone been successful?
Our sys admin decided not to continue with the repair and instead red-conditioned some other old nao battery. No news from our side.
any link to buy cheaper than $490?
I think we would be lucky if they continue to support the robots at all. Maybe they are going to stop.
Hello. Can Nao be use without battery, just on sector ? (if battery is HS)
My NAO shut down after boot…he say “gniark gniark” and shut down…
Anyone repair a battery?
Same here, we have two Naos with dead battery. What’s the best way forward?
Hi. After reading the comment that the batteries were Sony US18650NC1 2900mAh batteries, we ordered 6 from a UK supplier (£8.99 each). The original batteries were connected in series with flat plates which were spot welded to the cells. We soldered the new batteries together with wire as flat as we could and reconnected the wires that monitor each cell, but it was still a squeeze to get them back in the original case and then back into the Nao. Having done that, our Nao is back in action and working fine.
Hi all, We have the same issue, and I found there are some suppliers on eBay and the price is about 450 pounds. Is that reliable or do I have to order some batteries and fix them by myself?
Getting original new batteries would likely to be the best solution, if you can afford it. I found some web shops that listed these batteries, but they did not ship to New Zealand or they would just cancel my order.
We planned to do a school project with nao but the battery is broken so our robot is a paperweight now. There are no web shops at all that ship to the netherlands. Pretty wierd that such an expensive robot has this lack of support.
I do offer a repair service based in the Netherlands. I use quality cells from Sony, Panasonic or Samsung whichever are locally available at that time. Capacities vary around Typ. 2900 mAh, discharge current will be rated Min. 10A. All six batteries inside the pack will be replaced with new (non-refurbished) cells.
Please contact me, Marco, on naorepair at Makerspace040 dot nl or Whatsapp, Telegram or Signal me at +31 (six) 2035 (zero) 823.
To get a decent repair service running I need to receive 2 pack from the first repairs and I will return one working pack. Repair will take between 1 and 3 weeks. When sending me 2 battery packs, the repair will be free of charge.
The individual cells will be properly spot welded and kaptop tape will be used identical to the original battery construction. To open the pack I will have to saw through the clips holding the pack. I will glue the pack together with a 2 component epoxy glue.
Due to the way I need to open up the glues pack, the structural strength of the battery pack will be less strong as the original. Do not charge or use the battery pack unattended.
In case it helps, one of the members of the RoboHack forum has managed to revive several “dead” NAO battery packs and has posted the details on the forum, here: https://robohack.org.uk/viewtopic.php?f=5&t=69
Found batteries on Amazon.CA. Not the exact part number but specs look good. Anyone tried them?
Green Us18650 Vtc6 3.7v 3000mah Lithium Li-ion Battery Replacement Battery
My replacement battery cells have not arrived so I tried to fix them with the process above post from RoboHack forum. It worked! My two batteries are alive again. Thanks for the post.
We have two Nao’s at the school I work for, and I have successfully re-celled both battery packs. I am able to open the battery packs without using a soldering iron, but rather a jigsaw to carefully open both ends of the pack. This allows for neat gluing the top and bottom part together after the repairs.
I’ve used Sony / Murata 3000 mAh batteries, with maximum discharge rate of 30 A. Hot glued the six batteries together and isolated them with kaptop tape. Further, I used a spot welder to connect the batteries with 5 mmx0.13 mm nickel strips and insulated again with kapton tape.
The battery pack I made looks pretty exact like the one originally used, and finishes charging in about an hour.
just like Marco van Nieuwenhoven listed above, I am willing to provide the repair services to other educational institutions (in the Netherlands) for cost-covering prices.
For further information, contact me at info at coderclass in the Netherlands (from this info you can make the e-mail address)
Above I have offered a repair service.
Due to circumstances responses to messages and repairs were taking unacceptably long. My apologies for those who were involved. Currently I am not accepting new repairs.
I will resume the repairservice, but it will probably not be in 2022 anymore. A customer has asked me to make a mains connected battery pack, which does not contain any batteries. I will investigate this in 2023.
We should actually design 3D printable cases for the battery pack to increase maintainability. I don’t understand why the manufacturer made the case so that you have to saw it open…
So true, Ramin,
Just like you I have been looking for a printable case which isn’t there. Up to now I only repaired two batteries, but if the need arises I will look into modelling it in Fusion 360 and making it available to all, to make it better serviceable for the future. Opening the glued battery case a second time will probably make the battery case useless, so the need for a printed battery case will probably come somewhere in time.
ciao a tutti dopo la lettura dei commenti ci siamo convinti a comprare le batterie e far rivivere il nostro Nao. che da due anni ormai giace nella scatola. siamo in attesa che arrivino e vedremo come riusciamo a sistemare, ciao da un istituto professionale di Olbia, Sardegna
I started building a battery enclosure from ABS plastic sheets. I intended to put 6 batteries type 18650 in it and use a pair of external battery managers
in place of the circuit board (1 battery manager for each of the 3 cells).
Unfortunately, I do NOT have enough information to finish the project
because in spite of your pictures of the battery label showsing which
pins are for + and – I have been unable to learn what voltages or control signals are required for the other pins. So I am back to buying a new
battery or finding a used battery to refurbish. Is it possible that you have an additional weak or non-functional battery that you would be willing
to sell? Sincerely, trsimov@gmail.com
Thankyou for your advice to read the battery repair methods posted on
robohack. After reviewing their method I am surprised that after going to the trouble to force open the battery pack, they then charged the batteries
in series as a group rather than testing them individually and just charging
the ones that measured low. I’m guessing that the reason this worked is related to extra wires being connected between the circuit board and each
junction of the battery string. This looks like a battery manager connected
to a string of LiPo4 batteries used with solar panels. The battery
manager evens out the voltages and protects each cell from over voltage.
If the above is true then there is very little reason to open the battery
pack. Just charge it through the provided charging port with enough
voltage to get the charging process started. Then finish it with the
standard NAO charger. It might be safer to charge it a little at a time
at first to limit heating. And if some unlikely problem occurs, the
batteries are fully contained by the factory case. Thanks to everyone
for their helpful comments.
Hi. Can you tell me how you open the battery?
We have not yet come up with a method that would not also damage the casing. You might need to 3D print a new case afterwards or glue it back together.
Ok. But can you kindly tell me specifically what ÷ – and voltages of those wires connected to the green cylindrical cells? Because once i know, i can just get a voltage adjuster on which wires and run into 2 + – wires be connected to the lipo battery pack outside the black nao battery. Wait for your reply. I’m in California, USA
It looks like there are fat wires red, blue, yellow.
And thin wires of black, green, white, red
The thin wires have different voltages and need to know which pairs to + –
Same with fat wires… if you can tell me, that saves me time to run tester and i can just hook to universal lipo outside. Please help
I youtube it how to open a plastic enclosure using a box cutter without scratching the plastic…. it was so easy…. now, i need help on wires
Oh i also figured out the wires… follow this…
run to 22.2v red +
Blue – 11.1 v
Yellow – 3.7v
White – 7.4v
Green – 14.8v
Red – 18.5v
Black – 22.2v
Just use a voltage adjuster on each wire and run a wire outside to connect to 22.2v lipo batt… no need to use your nao charger… use a charger that comes with your universal lipo battery.
Add me in facebook. Look for Lan Lan :)
If you want someone to replace / repair your nao batteries you can email to contact@robot-maker.com.
Here is my try to fix it:
https://tippvomtibb.de/wiki/index.php?title=Aldebaran_NAO_Robot#Akku_defekt