Mr. ReBrick was on a big adventure tour through Canterbury, the home of LUG 4/2. He visited the amazing Castle Hill Cave. Thank god he remembered to bring all his safety gear.
Castle Hill Cave
At the entrance of the cave, Mr. ReBrick posed for an interactive panorama created with my LEGO Panorama Maker. Here is the resulting panorama:
And for all the non Kiwis, here is the location of this amazing Cave. It takes one hour to walk through it.
This is a model of the famous Honda CB77 Superhawk on which Robert Pirsig rode across the USA with his son Chris back in the 60′. Their journey has been captured in the global bestselling book “Zen and the Art of Motorcycle Maintenance“. Robert Pirsig’s philosophy of the Metaphysics of Quality is the basis of most of my LEGO models and this motorcycle is a tribute to Pirsig’s mind changing ideas. You can see more photos of the model at my flickr set.
You can make this model become an official LEGO set by voting for it over at LEGO Cuusoo. Here is a poster of the model:
Creating mosaics made of LEGO is a popular activity and you may enjoy looking at some examples at Mosaic Blocks or at the Flickr LEGO Mosaic Group. I started out with absolutely no LEGO mosaic experience and I wrote this tutorial along my way towards my first mosaic. I hope that the lessons I learned may also help you creating your own mosaics.
1. Selection of a source image and basic dimensions of the mosaic
Selecting your source image does seem like an easy task, but you need to be aware of some of the constraints to make a good choice. First, you should have as little detail in the photograph as necessary. You will be heavily limited on the resolution of the mosaic. The smallest unit of a LEGO mosaic is a single 1×1 plate that measures 8×8 mm (actually 7.8mm plus 0.1mm of play between bricks). This results in a resolution of 3.175 dots per inch (DPI) or 1.25 dots per centimeter. Maybe it would be wiser to refer to this as 3.175 bricks per inch (BPI) or 1.25 bricks per cm. A large base plate is 48×48 studs, resulting in 38.2 x 38.2 cm dimension (0.8*48-0.2). Photographs often use the proportion of 2:3 and hence a 2×3 base plate design would result in 96×144 bricks or 76.4 x 114.6 cm.
For my mosaic I selected a portrait of Robert M. Pirsig, one of my personal heroes. The source image is a grey scale image, but creating colorful mosaics follows the same process as a grey scale mosaic.
I started a crowd funding project to create the Unofficial LEGO Minifigure Quartet card game. Please support this project by pledging as much or as little as you desire. The goal is to create a quartet card game that features LEGO Minifigures. Quartet is a card similar to Super Trumps or Go Fish. I am using the IndieGoGo crowd funding platform for this purpose. Please help!
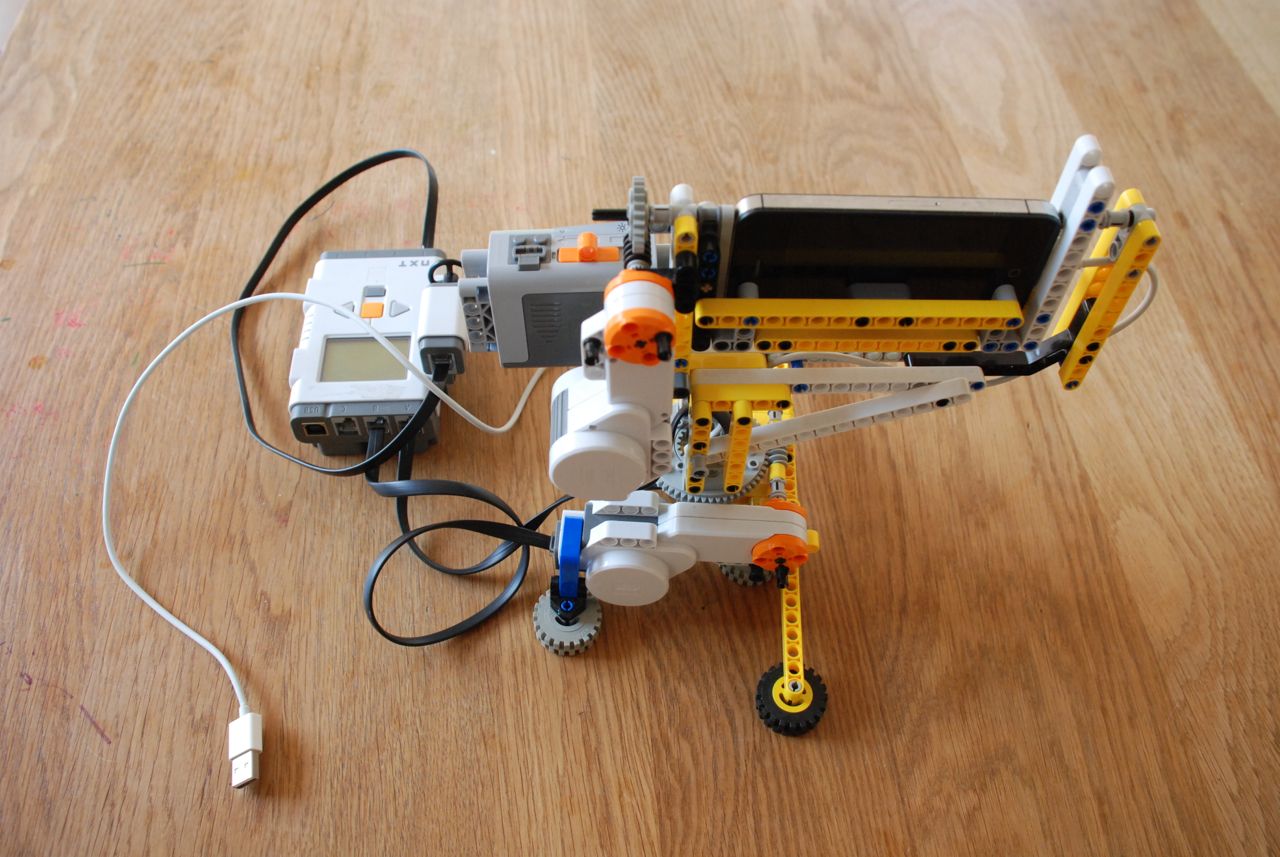
Panoramic photography is one of my passions. With the arrival of panorama apps for the iPhone the game has changed, yet again. You can easily create panoramas right on your iPhone. Not only can you stitch them on the phone, but you can even continuously shoot spherical panos with PhotoSynth (free) or 360 Panorama (commercial). You can simply pan and tilt the camera while holding the camera in your hand, but the more elegant and more precise method is to use a motorized camera head. I build one from LEGO and used the Mindstorms NXT (no need for the EV3 for this).
The same principles that classical panoramic photography also applies to this new generation of pano apps. Most importantly, the pivot point of the camera head needs to be in the “no parallax” point of the camera. Since the lens of the iPhone is very small, it is sufficient to just place just into the pivot point. In figure 1 you see how the rotation axis of the motorized camera head roughly meet at the center of the camera.
The LDD file is available here and the building instructions are also available. I also created a page at Rebrickable.
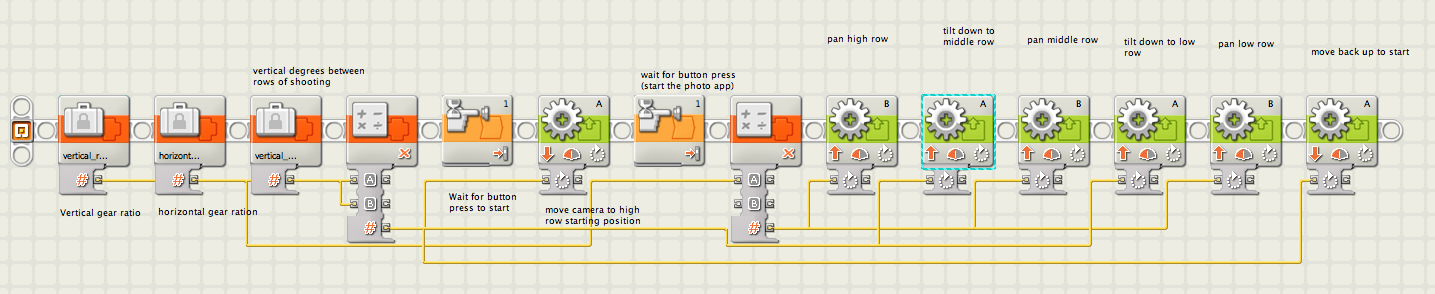
Programming is very straight forward:
Screenshot of the program
Here is a video of the an earlier version of the motorized camera head in action: