
Computers and consumer electronics are merging. The first media center PCs have arrived and are slowly taking over the living room entertainment. They offer a wide range of functionality that exceed everything that previous consumer electronics could offer. That is what i was let to believe. This guide documents my experiences of setting up a digital media center based on an EPIA M10000 motherboard in a Morex 2699 case. By the way, i am a stupid Mac user, so be prepared to get some real interesting questions.
Table of contend
Introduction
I do not like Windows I am a Mac person. Still, I actually built a custom PC and dealt with all the great benefits that Windows has to offer. Cracking the obligatory Windows XP registration, installations of drivers, virus infections and updating the BIOS. Darth Wader was not yelling at me “you gonna join us or die – hhmmm ssheeeesss” while pointing his light saber at my neck and neither was my only alternative watching a Scooby Doo marathon.
I had a goal: creating a small and silent media center that can record each and every “Shark attack!” program on Discovery, live radio transmissions of the debates in the German parliament and show the pictures of my last visit to my buddy Saddam. I can already hear you scream: “iLife!” which is indeed an excellent group of programs, but it cannot record video from an analog TV/Radio signal. Yes, there are also TV/Radio tuners for Macs (EyeTV, Studio TVR, myTV, Gravision TVa) that turn your machine into a digital video recorder, but I wanted an integrated solution. Several software suites on the Dark Side combined iLife functionality with a digital video recorder and present themselves with a TV friendly front end (Windows MCE, myHTPC, ShowShifter, Home Theater, Power Cinema). Even the usually not so media oriented Linux community has their front ends Freevo and MythTV. You connect the computer to the TV, sit on your couch and control the system with a remote control.
Another aspect made me sell my soul: size. Ever since Apple stopped building the tiny Cube I longed for a small and silent computer that I could place in my living room. I have to suffer day by day from my G4 MDD Mac, the noisiest Mac ever produced. Even the exchange of the fans did not reduce the noise to a comfortable level. I really wanted a small and silent solution. Some years after the Cube the Dark Side also started to produce small computers. Namely VIA had the great idea to produce motherboards of only 17 x 17 cm following the Mini-ITX standard. These boards are highly integrated and include an onboard graphic chip, ethernet, and a full variety of other interfaces (USB, Firewire, IDE, RS-232, etc.).
Hardware considerations
Several motherboard versions are available from VIA ranging from fan-less and therefore silent 500Mhz boards to more noisy 1Ghz boards that also include an MPEG decoder chip. The basic tradeoff concept is simple: the faster the CPU, the more power it consumes, the more heat it generates the more noisy fans are necessary to cool it.
All of these boards are suited for basic office work email, surfing the internet and even putting the picture through the video out onto a TV. The biggest model even can playback DVDs with the help of the integrated MPEG decoder chip. If you only want to playback media you are all set, but if you want to play live TV or record TV programs you need a TV tuner. Since the whole system should be as small as possible a graphic card is the weapon of choice, preferably none of those gamer monster cards that have a fans that can blow-dry a pack of poodles in a few seconds. The Hauppauge WinTV PVR350 appears to be a good choice since it has the distinct advantage of an onboard MPEG2 chip. It encodes the incoming TV signal before it stores it on the hard disk. The CPU of the Mini-ITX motherboard would never be able to do this in real time. In addition it also has a radio tuner. Why bother about the size of the movies, you may wonder, the capacity of hard discs become bigger by the minute and according to our estimations we will be able to store the entireinternet on it by next Tuesday. But again, size matters. Standard 3.5″ hard disks, especially the fast ones, produce heat and noise. The small 2.5″ laptop disks are much better suited, but unfortunately have much less capacity. This TV card has one disadvantage, you cannot use its video out with myHTPC. It only works with their own WinTV application. Therefore you must have another video out to see anything on your TV. The Mini-ITX boards usually have video out, but their quality is not overwhelming.
The PVR350 also has some disadvantages: it is a full size PCI card and produces a considerable amount of heat. This card had therefore a considerable influence on my choice of the casing. Even though you can store all the equipment in the most unlikely places I was not prepared to invest my complete vacation in it. Given that I would use the VIA M10000 mother board, a slim line Combi Drive, a 2.5″ hard disc and the PVR350 four cases appeared suitable: the Hoojum Cubit 3, Travla 137, Travla 138, and the Morex 2699.
After talking to an expert at HRT the Travla 138 stopped being an option since there would be too little space left in the case to guarantee enough airflow to cool the card. The Travla 137 appeared to have a noisy fan in a special dimension that cannot easily be replaced by other standard fans. The Cubit 3 looks excellent, but it would not fit into my TV rack. It is simply too high. The Morex 2699 fits nicely into a standard TV furniture and in black color it is not as ugly as other computers. The biggest disadvantage of the Morex 2699 is its two small fans, so I bought two silent Papst fans and built them in instead. Detailed reviews of Travla 137, Travla 138 and Morex 2699 are available.
Complete systems are of course also available, such as the Tranquil or Hush systems. Surely, they are much slicker and designerish, but where is the fun in that? Why invest more than a thousand euro when you can enjoy customizing the system yourself? That way you get to know the inside of the computer much better and doing extensions or upgrades later on become a swift.
I ordered the Morex 2699 case and the three Papst fan from my favorite Mini-ITX dealer and after only a few days it was delivered. Detailed instructions on how to build all the hardware in is available and in case of doubt it is always good to consult the motherboard’s manual.
Hardware installation
The biggest challenge was building in the Hauppauge WinTV PVR350. The card does not fit through the PCI slot hole of the case. The little pins and the screws are too big (see Figure 1).
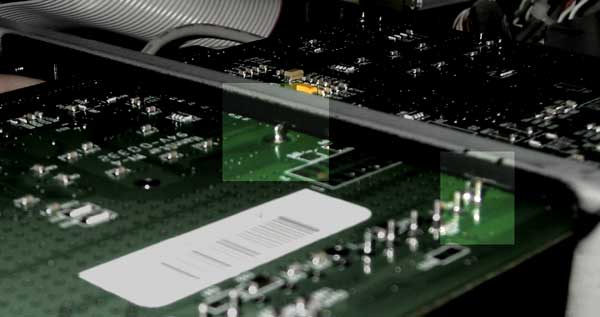
Figure 1: The problematic pins of the PVR350
The first step was therefore to take out the screws and detach the silver metal blend of the card. Then I grinded a notch at the top side of the slot hole. I also had to make a small notch on the right top side to allow the card to fit in perfectly (see Figure 2). It is a good idea to put some paper through the PCI Slot hole to prevent any metal dust to fall into the fans.
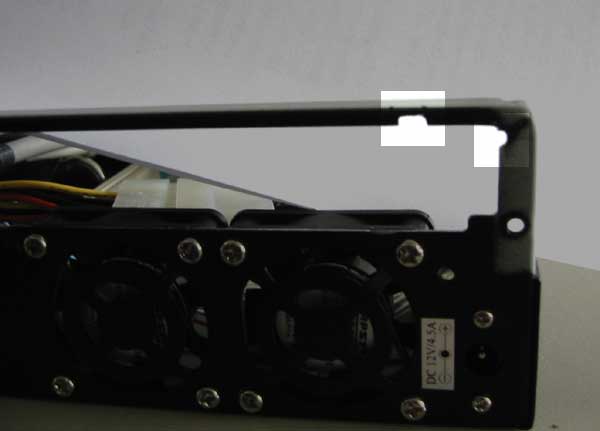
Figure 2: notches in the Morex case
Also, the silver metal blend of the card was slightly too high on the corner. I grinded off a bit to make it just fit (see Figure 3)
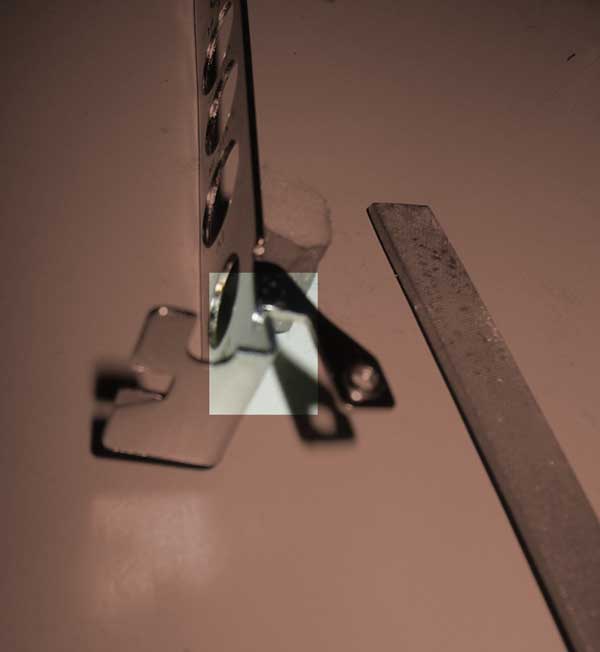
Figure 3: Grind of the corner
Next I put the card through the slot hole and attached the silver blend back on (see Figure 4). The screws are now inserted from the bottom of the card. It has a little bit of a slack, but together with the riser card it will be tightly fixed at the end.
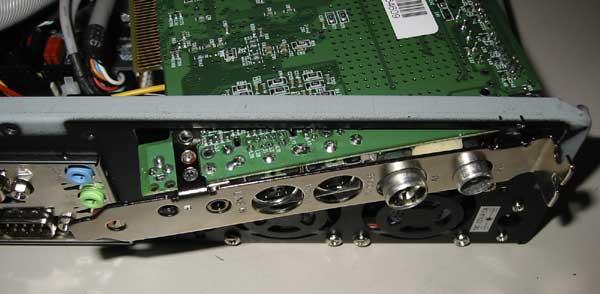
Figure 4: Inserting the card with the screws still out
Before putting the card into the riser card it is a good idea to first put it into the black card holder that came with the case (see Figure 5).
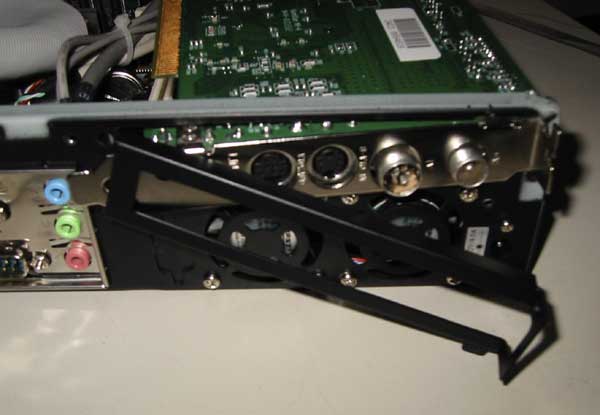
Figure 5: Attaching the blend
There is still enough space left at the end of the card to insert a small slim 3.5″ devise into the front slot (see Figure 6). I will try to build in a card reader, but that is another story.

Figure 6: Space for a card reader
I closed the case and voila, a small decent computer (see Figure 7). The case also comes with a foot to position the case upright. So far so good. Until now this has been quite fun.

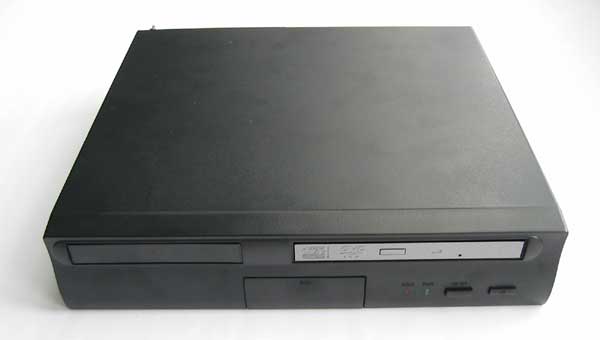

Figure 7: Front, top and back view of the case.
The fans are still far to loud for my taste. The CPU fan and System Fan are supposed to be temperature controlled, but I cannot confirm this. They run at a constant speed no matter what. This is supported by a posting in the VIA forum. If this was to be true then i have to admit that this is a rather big screw up. These motherboards are intended for small silent PCs. This cannot be achieved when you cannot control the fans. No wonder that Zalman is already selling a manual speed controller. You can get it from mini-itx.com. Alternatively you can change the speed of the fans by changing the cabling or by inserting a resistor. I put the CPU fan and one case fan in a serial connection (see Figure 8) and thereby halved their Voltage/Power. It makes a big difference if the fans run at 12V or 6V.
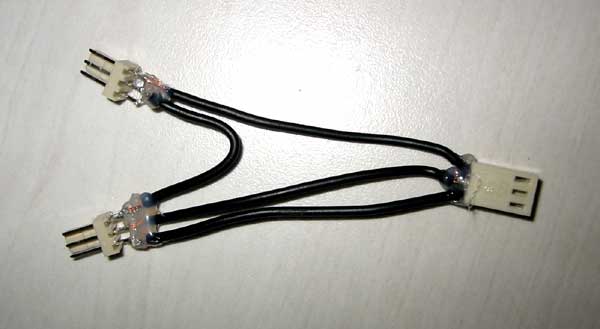
Figure 8: Serial connector for two fans.
I put a temperature sensor into the case and monitored the heat right next to the CPU. In addition i recorded the noise of the computer at 30cm distance. The ambient noise level was at 41dB, which is rather quiet. The CPU was put under 100% usage.
| Setting | Noise in dB | Temperature in Celsius |
| 1 case and CPU fan at 12V | 55 | 35 |
| 2 case fan at 6V, CPU fan at 12 V | 55 | 44 |
| 1 case fan at 6V, CPU fan at 6V | 45 | 58 |
Table 1: Noise and temperature of the computer
The conclusion of my little test is that as soon as any fan runs at 12V you get the full noise. However, it still sounds subjectively quieter if the only the CPU fan runs at 12V. For normal tasks it is certainly enough to run the fans at half speed. I will continue to monitor the temperature in my normal every day use.
Software installation
System software and drivers
The next step is to install Windows XP. That is no fun and takes quite a while.Once it is up and running the next step is to install all necessary Windows updates because there are just too many viruses, worms and hackers out there. Welcome to Windows!When I looked at the device manager it still found an unidentified VGA compatible device. Trying to install drivers from the Hauppauge CD or the Windows CD failed. Great! So lets call up my personal Windows master Hu Jun. He informed me that I still had to install the drivers for the motherboard. That is the most absurd thing for a Mac user. Well, Via had them posted on their VIA EPIA M web site and once I was at it I also downloaded the other drivers for USB2, Ethernet and Audio. After the installation the device manager appeared to be ok.
The next step was to install the drivers for the TV card. Hauppauge posted updates on the web site which are important to install. In particular the MPEG decoders and infrared receivers. I installed the Win TV software that came with the PVR350 card and was able to tune some channels. So far so good.
Setting up the Hauppauge remote control to work with myHTPC was confusing, but at the end rather easy. Hauppauge already provides an infra red control software and one only has to add the myHTPC settings to that file. The instructions are available in the support forum.
All my media files, such as photos, music and movies are stored on a Mac. Since you can enable windows sharing it is also not problem for myHTPC to access them. However, my files are not stored in my home directory on my Mac server. I have two additional hard disc on which i place my music, movies and pictures. I found an article that explain how you can make any directory or disc available through windows sharing by changing the Samba configuration file.
This worked fine through the cable ethernet, but when i wanted to use the wireless lan usb stick i ran into trouble again. Setting up a Windows XP PC to connect to an Apple Airport Base station is not trivial, because neither Apple or Microsoft document it well. After extensive research i found this excellent instructions. Take great care that you get the HEX password right! This information was not in the hand books or on Apple’s web site. If Apple emphasizes its Windows compatibility then they should also provide the proper documentation.
Another part of the puzzle is the digital audio output of the system. Considering the quality of the line out and the requirement to playback DVDs it was necessary to change the default video cinch out to operate as an SPDIF digital output.This setting has to be jumpered on the mother board and set in the operating system. Detailed instructions are available.
Last not least a bit more Mac user nativity. I thought that Windows XP (experience?) is a true multimedia operating system. So, in goes the DVD, and the media player starts right away. But it cannot play it because it does not have the right MPEG2 codecs. Apparently Microsoft did not want to pay the licence fee. You actually have to install a third party software for it. This is simply ridiculous, but then again, maybe I am an spoiled Mac user.
myHTPC
Microsoft Media Center Edition’s (MCE) front end software takes too much CPU power from an VIA EPIA M10000 board. The playback of a DVD in the stand alone Media Player works fine, but from within MCE it is impossible. MCE alone takes about 70% CPU time. ShowShifter is a very good front end software, but it does not support hardware MPEG decoders. An EPIA M10000 has to rely on the MPEG2 encoder chip of the Hauppauge PVR350 to record TV in real time. For the time being, only myHTPC works in the given configuration under windows.
One of the problems of myHTPC is that it is badly document. There is no handbook and only little official instructions compared to the hundreds of problems you might run into. The quick start guides are simply not enough. The support of myHTPC is therefore based on forums. If you can read German i strongly advice you to read the installation instructions on the German myHTPC forum. Overall I must admit that the instructions in the German forum are even better than the original English myHTPC documentation. If the Germans do it, they do it right ;-)
gotTV
Again, you should read the detailed instructions on the German forum. They are very detailed. After I installed gotTV it was not possible to tune the channels in the goTV plugin. I tried all options and dug through the forums without finding a solution for my problem. Finally, i connected the computer to the TV in our living room instead of in the office room and viola, it worked. We have internet through the TV cable and apparently the devices installed through our internet service provider corrupted the TV signal somehow. But still I had to add all the channels manually with their frequencies. The auto tuning did not work. I took the frequencies from our cable TV provider’s web site.
Watching live TV on a computer screen is fun for about two minutes. The real value lies in the Electronic Program Guide (EPG). I used TVgids_to_XML to grab the Dutch TV program information. Worked like a charm.
Girder
It is possible to control myHTPC with the Hauppauge remote control, but when you also want to use gotTV you run into trouble. I could not find a way around not using another good software: Girder. Again, the German myHTPC forum has detailed instructions.
Conclusions
I connected my digital media center to my TV in the living room and started the system. However, I could not remove the computer screen, mouse and keyboard yet. From time to time errors occur. Sometimes the wireless network breaks down, the scheduled EPG data grabbing did not work or myHTPC crashes. The system is not yet mature and still has many shortcomings. For example, it is not possible by default to delete recorded shows. You either have to download an visual basic script and integrate it into myHTPC or use a remote desktop software to maintain the software from another computer. myHTPC is a very good free software with a strong community behind it, but it is not yet mature enough. The installation and maintenance requires considerable computer knowledge.
A word about the noise. I had the two case fans sharing one power source and thereby reducing their speed. While this solution is much much quieter, it turning out to be problematic in every day use. The computer got really hot while recording shows, due to the heat the PVR 350 generates. As a consequence, the network connection crashed several times. It appears as if the ethernet adapter does not handle heat very well. I had to fall back to connecting one fan to the full 12V. This made a major difference. The case now remains at a reasonable temperature. The people at HRT already mentioned this to me when i bought the case, they really know what they are talking about! Also, it is really annoying that the fans are not temperature controlled. They run all the time at full speed and produce an intolerable amount of noise. I only take the computer out of standby when I really need it.
But is this digital media center worth while all the trouble, I ask myself. I spend weeks figuring out all the details and I got frustrated so many times. My answer is NO. The whole system is not mature enough for me to really enjoy it. The noise, reliability and maintenance are not yet suitable for my living room. However, it is a nice hobby for the working room. I learned a lot about Windows, driver problems and how to troubleshoot a windows computer. But do I really want to know all this? NO! I want an easy to use and highly reliable Mac system. Apple made a first step now by introducing Airport Express with Airtunes, which at some point might be extended to also stream video. Lets hope for another of Steve’s keynotes…